Go back to all articles

Website Load Testing Tutorial for QA Engineers

Sep 8, 2025
4 min read
author denis sautin preview

Denis Sautin

Author

Denis Sautin

Denis Sautin is an experienced Product Marketing Specialist at PFLB. He focuses on understanding customer needs to ensure PFLB’s offerings resonate with you. Denis closely collaborates with product, engineering, and sales teams to provide you with the best experience through content, our solutions, and your personal journey on our website.

Product Marketing Specialist

Reviewed by Boris Seleznev

boris author

Reviewed by

Boris Seleznev

Boris Seleznev is a seasoned performance engineer with over 10 years of experience in the field. Throughout his career, he has successfully delivered more than 200 load testing projects, both as an engineer and in managerial roles. Currently, Boris serves as the Professional Services Director at PFLB, where he leads a team of 150 skilled performance engineers.

Performance testing is no longer reserved for specialized engineers. In the AI era, QA professionals can extend their functional testing skills to include load testing because new tools automate the most challenging aspects. PFLB offers an AI‑powered load testing platform that eliminates manual scripting and data analysis, letting you build realistic tests and receive detailed performance reports — even if you’ve never done load testing before. In this tutorial, we’ll show you how to go from sign‑up to an actionable AI report.

Before You Begin

What we will test

This guide is for a static website. We will script simple page loads only (for example, Homepage and Contacts). There is no login and no form submission in this tutorial. Dynamic flows that require parameters, sessions, or correlations will be covered in a separate guide. If you need help sooner, contact us for a live demo, and we will walk you through it.

What this guide does not cover

  • Authentication, carts, search with facets, or any flow that needs correlation or data management
  • API tests or synthetic data generation
  • Complex SLAs or multi‑region traffic patterns

What you need

  • A PFLB account with access to the free plan (we will use 10 VUh, which equals 10 virtual users for roughly one hour)
  • Google Analytics access to your site (optional but recommended)
  • Chrome to record HAR files (we will record a single page per use case)
  • Permissions to test the chosen site (use staging if possible; if testing production, schedule a small window and inform stakeholders)

Assumptions

You are a QA engineer who has not done load testing before but is familiar with these basics:

  • Use case = a user journey or page we will request
  • Scalability = increasing user load step by step to find when performance degrades
  • Traffic = requests per second handled by the site

Outcome

You will:

  1. 1.
    Build a workload model from GA or from HAR files,
  2. 2.
    Configure a Scalability test that ramps users gradually,
  3. 3.
    Run the test, watch the key charts, and
  4. 4.
    Create an AI analysis report you can share.

Why a scalability test

A scalability test helps you understand how your site’s performance changes as more users arrive. Instead of jumping straight to a high number of virtual users, PFLB increases the load step by step. This way you can see the exact moment when:

  • Response times start getting slower,
  • Errors begin to appear, or
  • Throughput stops growing.

That’s the point where your system reaches its current limit. Knowing this is critical because it shows how far your site can scale today and gives you a baseline for planning improvements.

In this guide, we’ll keep it small — ramping from 1 to 10 virtual users — because the free plan includes 10 VUh, and it’s enough to demonstrate the principle.

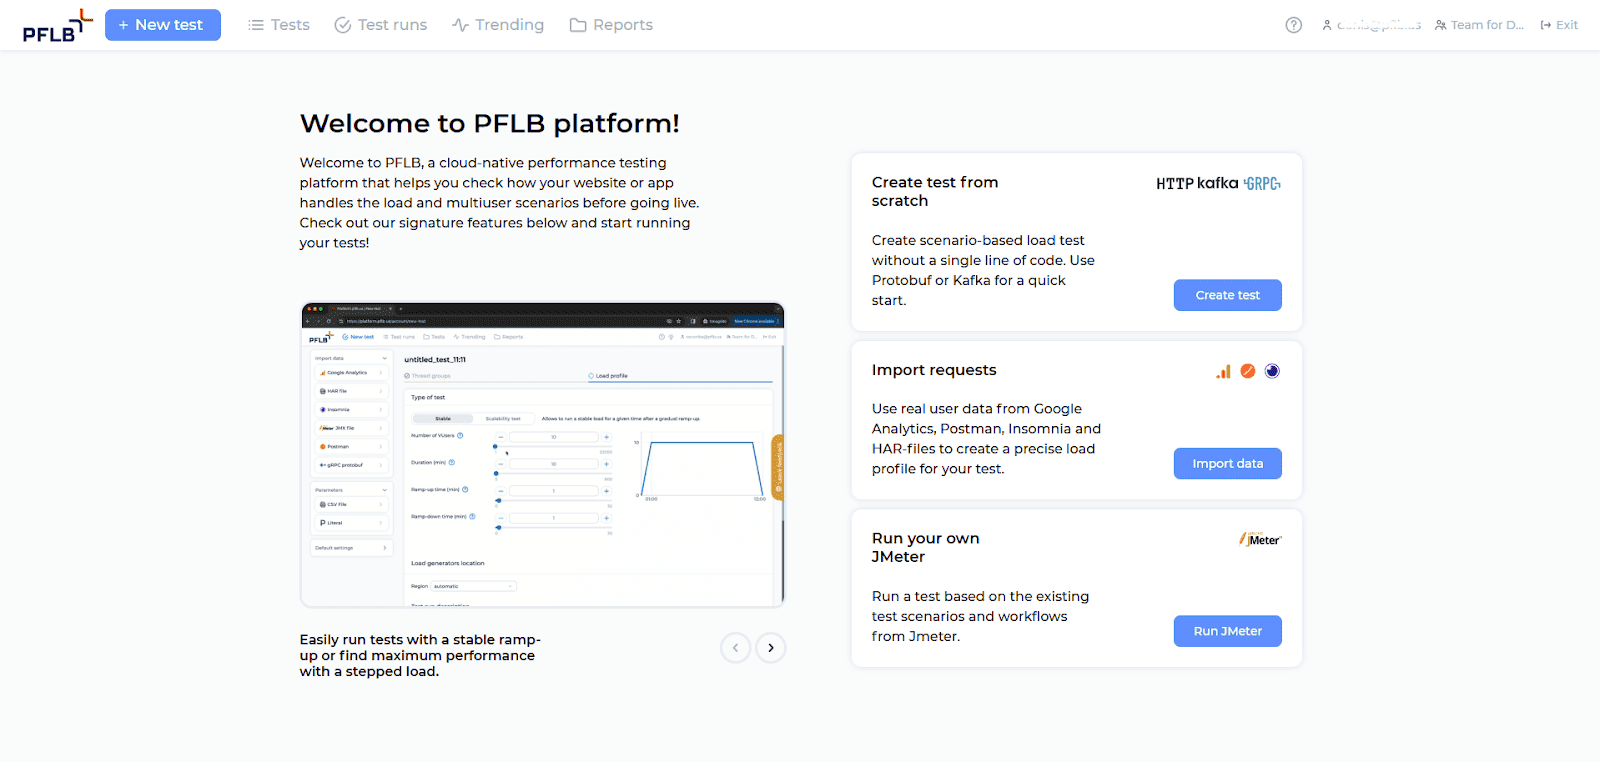
Step 1 — Sign Up to PFLB

  1. 1.
  2. 2.
    Confirm email, sign in.
  3. 3.
    Click + New test to open the test wizard.
website load testing step 1 sign up

Step 2 — Create a Workload Model from Google Analytics (Optional)

PFLB can convert your actual production traffic into a workload model — a data set that defines how many users visit each page and when. This method is ideal for realistic tests.

  1. 1.
    On the left navigation pane of the test wizard, click Google Analytics under Import data.
  2. 2.
    Choose Add account, authenticate with your Google account, and grant PFLB permission to read GA data.
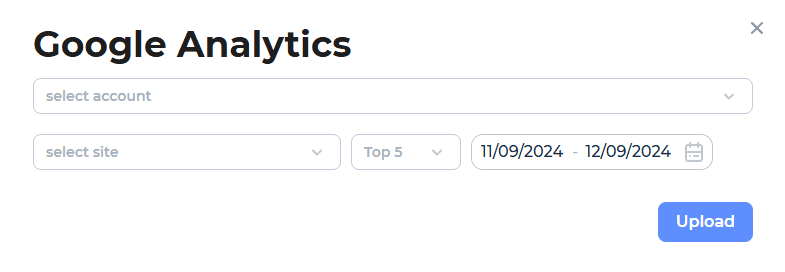
    website load testing step 2 workload model
  3. 3.
    Select the GA property (site) and specify how many top pages to include (e.g., Top 5 or Top 10).
  4. 4.
    Choose a date range representing typical traffic; PFLB uses this period to calculate page weights and arrival patterns.
  5. 5.
    Click Upload. PFLB generates a load profile showing each page’s percentage of visits. This profile can automatically create use cases and assign weights to requests in your test.

If you don’t have Google Analytics access, skip this step and proceed to HAR import (Step 3). You can still build your workload manually.

Step 3 — Import Requests from a HAR file

If you used GA in Step 2, PFLB has already created named use cases such as “Homepage” and “Contacts”. Now you’ll import a single‑page HAR to each matching use case so PFLB knows the exact HTTP requests.

Record a single‑page HAR in Chrome (repeat per page):
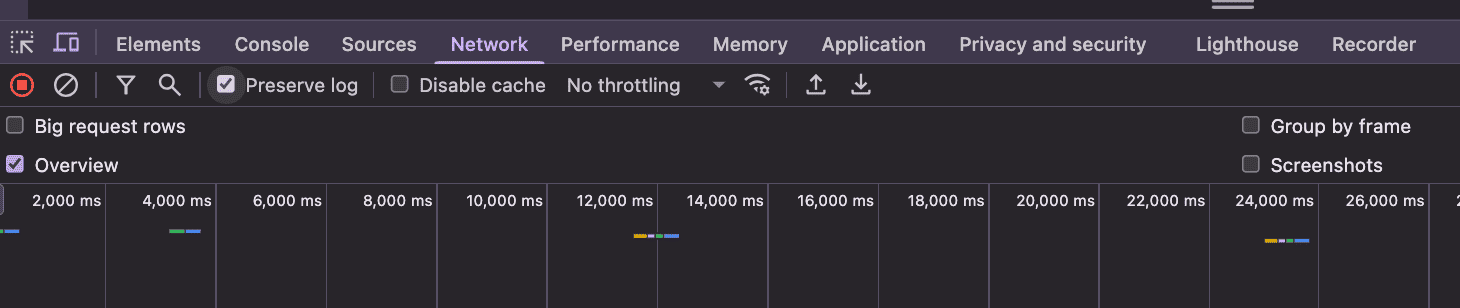
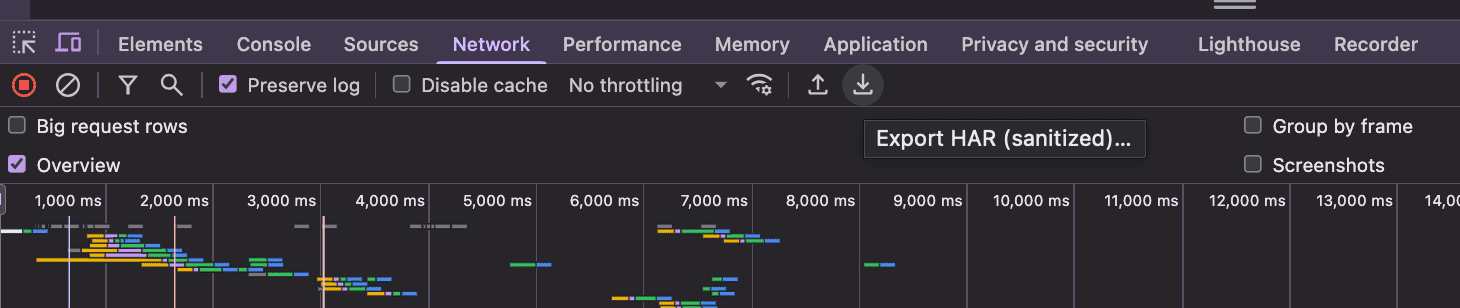
  1. 1.
    Open your site in Chrome. Go to Developer Tools (Press F12 on Windows or “⌥ + ⌘ + J” on Mac) → Network tab.
  2. 2.
    Turn on Preserve log and ensure the red record dot is active.
    website load testing step 3 2 network preserve log
  3. 3.
    Load only that page (e.g., the homepage). Don’t click further — we want a single‑page capture for a static site.
  4. 4.
    Click the Export HAR icon [↓] → Save as homepage.har.
    website load testing step 3 3 export har
  5. 5.
    Repeat for each page (e.g., contacts.har).

Upload HARs to PFLB:

  1. 1.
    In Use cases & requests, select the use case Homepage.
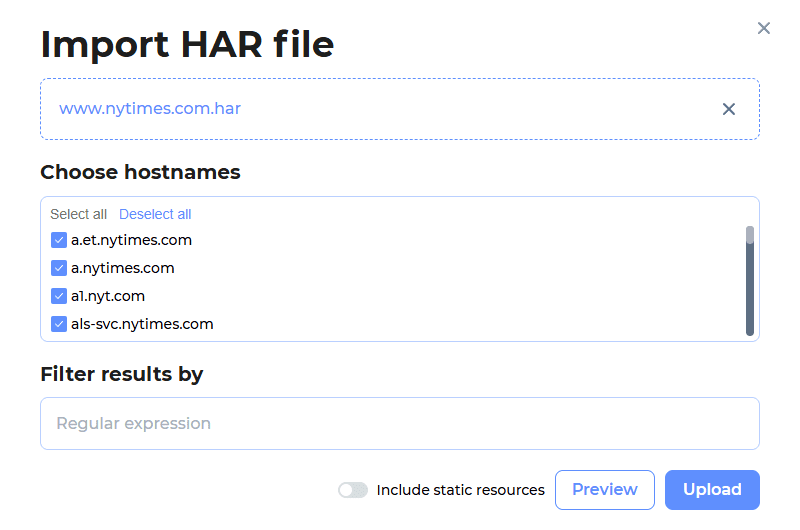
  2. 2.
    Click Import data → HAR file, upload homepage.har, confirm.
    website load testing step 3 4 import har
  3. 3.
    Repeat for Contacts with contacts.har.
    PFLB parses the HAR and places requests under the correct use case.

No GA? Create use cases named “Homepage”, “Contacts”, etc., then import the matching HAR files into each.

Step 4 — Configure the Load Profile

In this step, you define how virtual users will arrive and behave during the test. This is where you transform use cases (pages or actions) into a scalability test.

4.1 Choose Profile distribution

You need to decide how virtual users are spread across your use cases:

  • Percent mode – assign percentages that sum to 100 %. Example: 70 % Homepage, 30 % Contacts. PFLB will distribute virtual users accordingly.
  • Users mode – assign exact numbers of users per use case (advanced).

For our static site test, keep it simple: use Percent and set each use case to 50 % if you imported two HARs (Homepage and Contacts).

pflb ai powered load test report step 4 1

4.2 Select the Scalability Test

Click the Scalability test under Test type. This mode gradually increases the load step by step, helping you see at which point the system fails.

website load testing step 4 2 scalability test

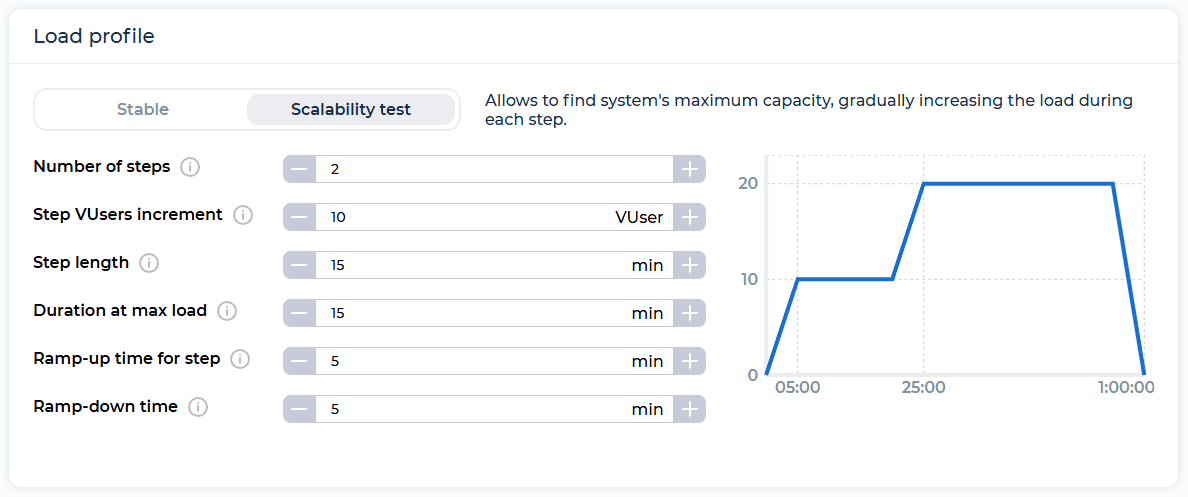
4.3 Configure parameters

For a free package demo (10 VUh), set:

  • Number of steps: 10 (this means 1 virtual user is added each step until 10).
  • Step VUsers increment: 1.
  • Step length: 1 minute.
  • Duration at max load: 10 minutes (hold at 10 users).
  • Ramp-up time for step: 0–1 minute (0 = instant start, 1 = gradual).
  • Ramp-down time: 1 minute.

This configuration means the test will ramp from 1 to 10 users, one per minute, then hold steady at 10 users.

At this point, you’ve fully defined the workload model execution:

  • Pages (from HAR/GA)
  • Distribution across them (Percent)
  • Growth pattern (Scalability test, 1→10 VUs)

Click Save and proceed to the SLA step.

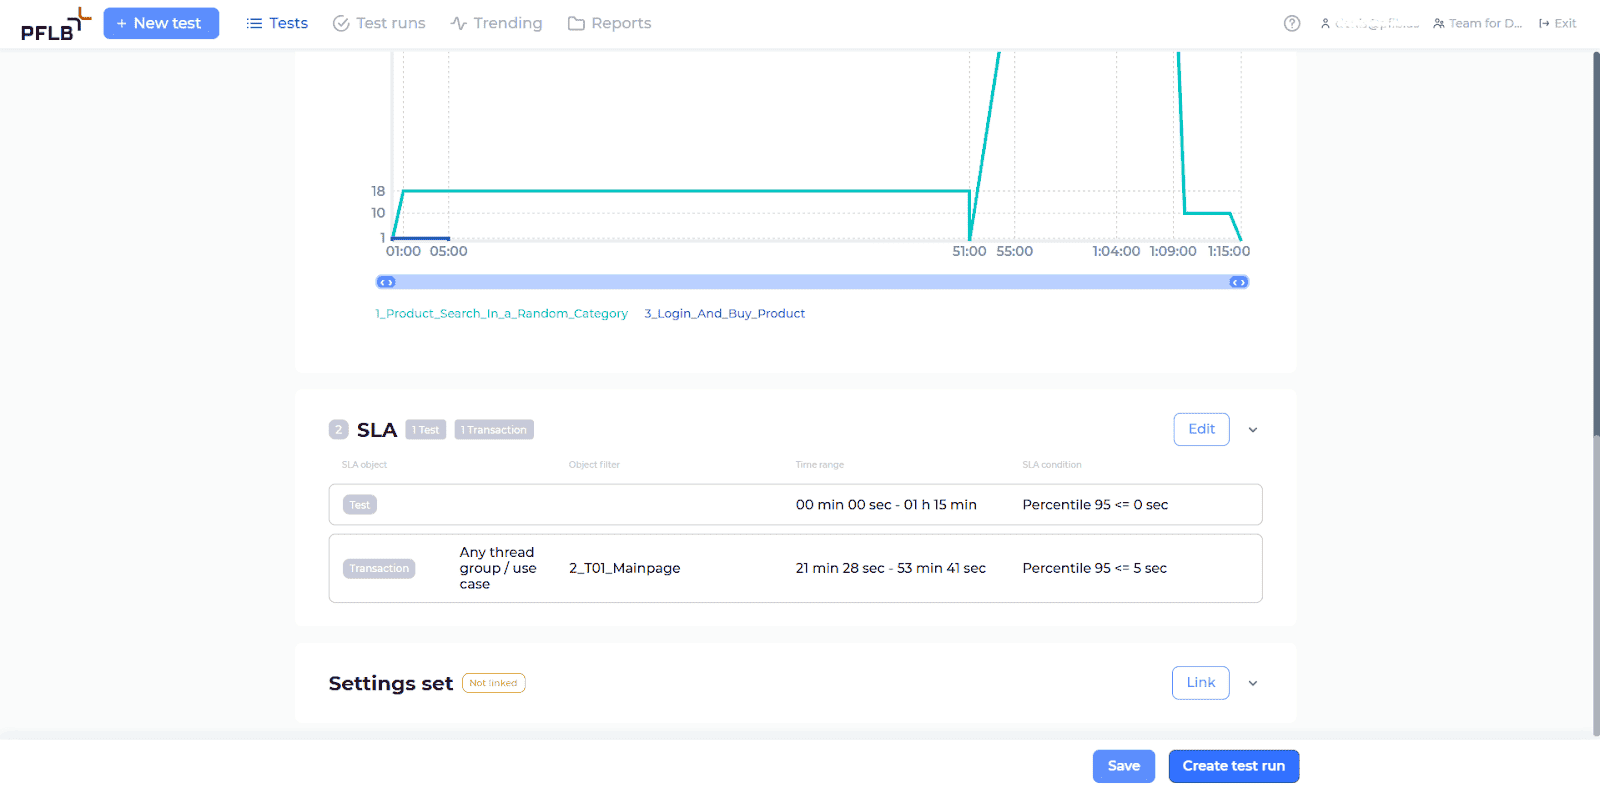
Step 5 — Add a Simple SLA

SLA (Service Level Agreement) in this context is a numeric target you want the system to meet under load (e.g., “average response time ≤ 500 ms”). It’s not a legal contract here — it’s a test‑time pass/fail threshold.

For your static site, add:

  • Average response time ≤ 500 ms
  • Error rate ≤ 1 %
website load testing step 5 sla

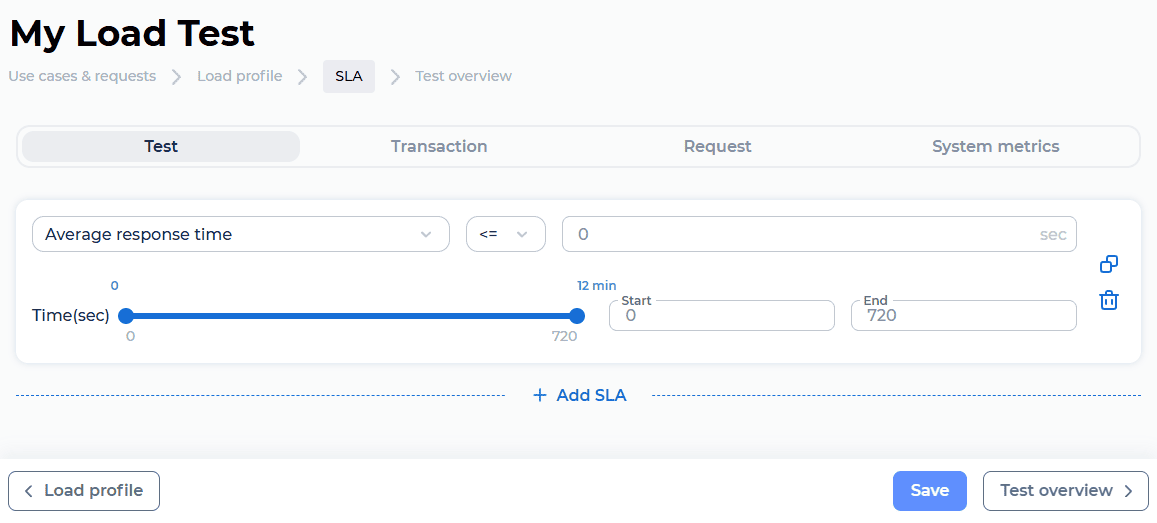
Set these in the SLA step. During and after the run, these thresholds help you judge success quickly.

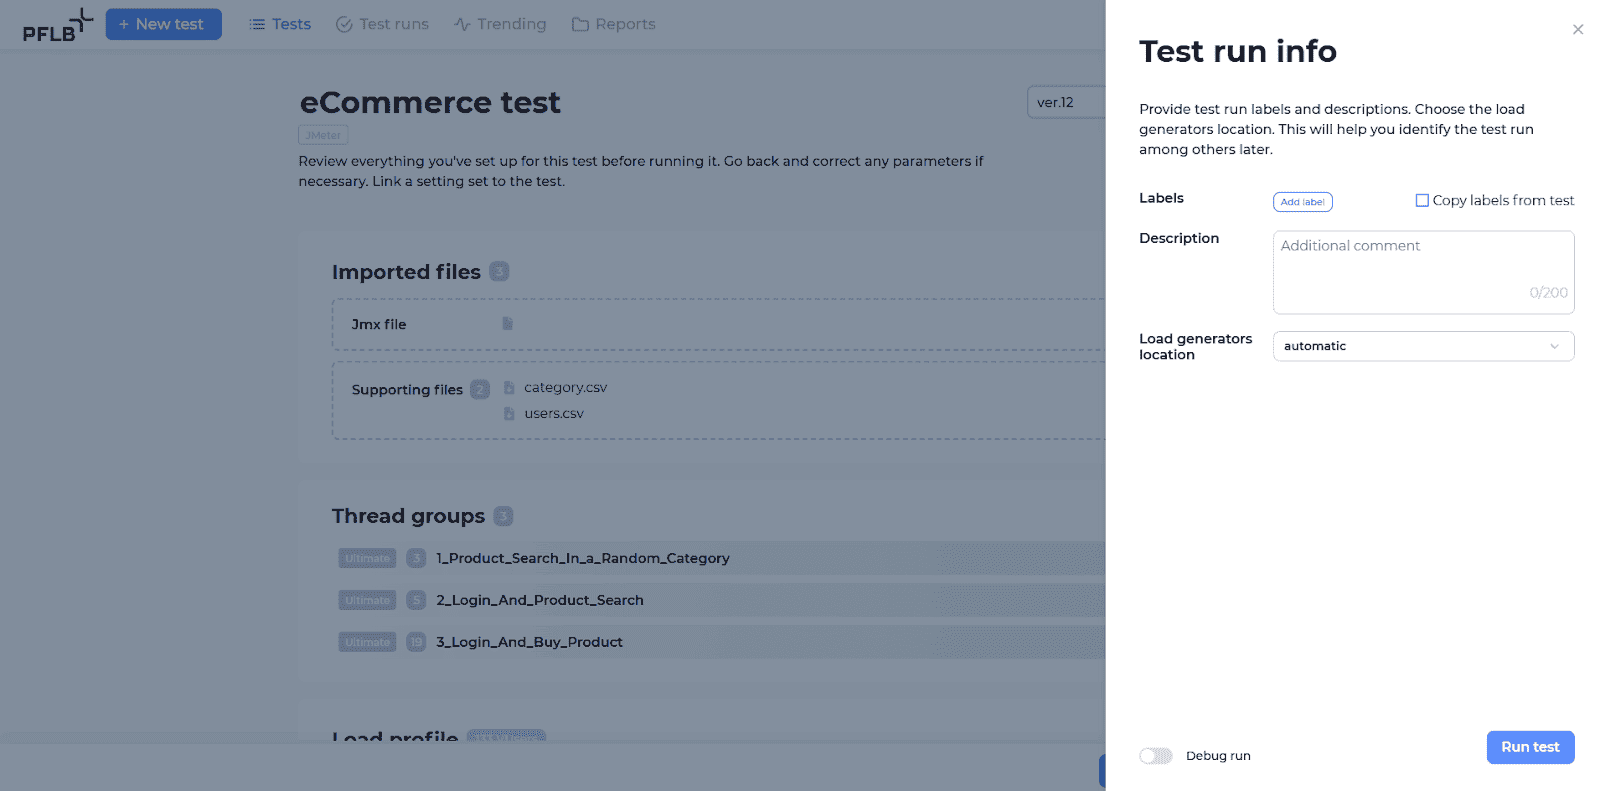
Step 6 —  Review and Run the Test

  1. 1.
    The Test overview summarizes your use cases, load profile, and SLAs.
  2. 2.
    Click on “Create test run” at the bottom-right of the test setup page.
    website load testing step 6 1 create test run
  3. 3.
    In the pop-up, you can optionally:
    website load testing step 6 2 test run
  • Add labels for easier identification later.
  • Specify load generator location (or leave it as automatic).
  • Click “Run test” to start your test.
  1. 4.
    Allow the test to complete (in our example, 30 minutes for ramp‑up plus hold). Because there are 10 users for 1 hour, you’ll consume 10 VUh — exactly what the free package provides.
  2. 5.
    Watch the run. Open the Test runs page. You’ll see your test listed with live status. Click into it to view:
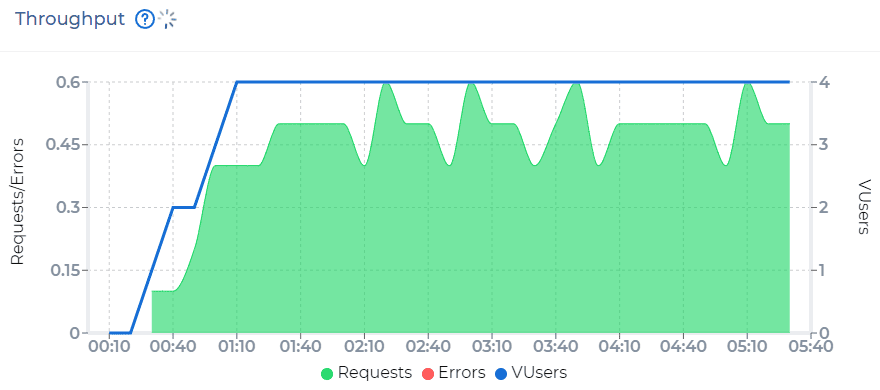
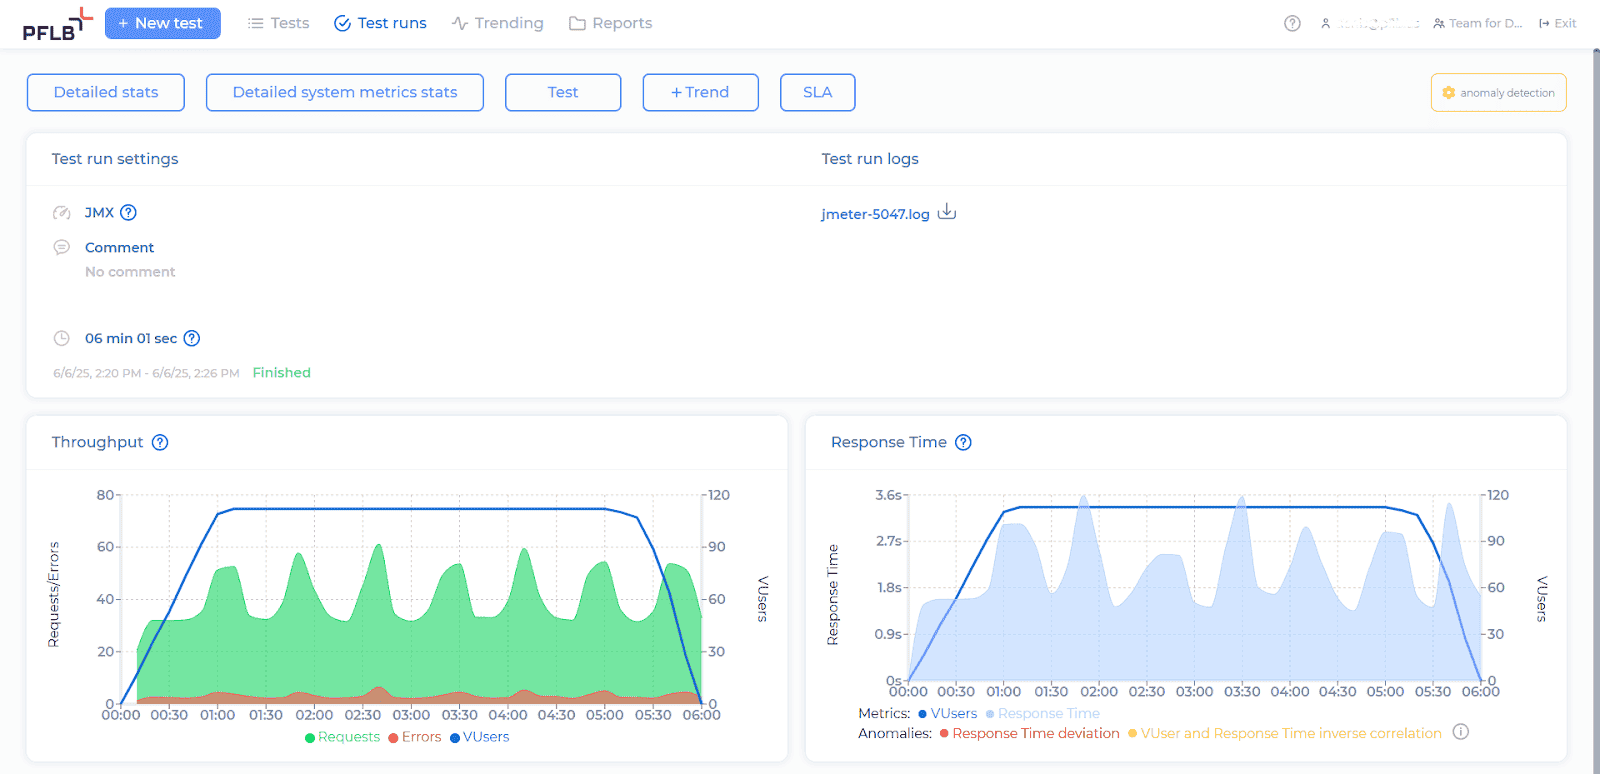
  • Virtual users ramping up step by step.
  • Throughput (requests per second) showing how much traffic is handled.
    website load testing step 6 3 test run troughput
  • Errors if pages begin to fail.
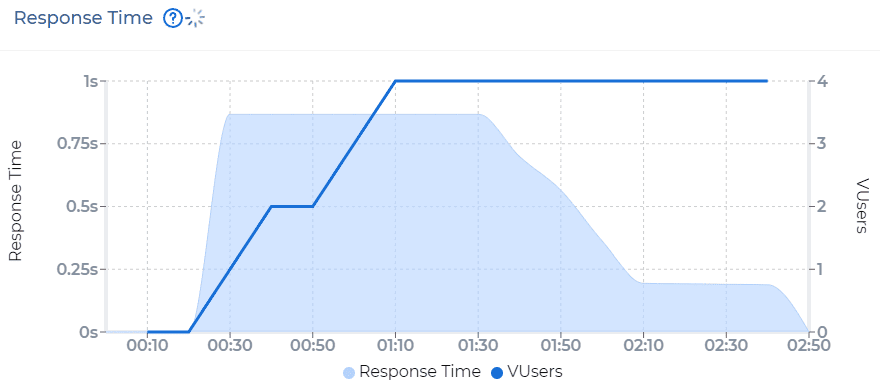
  • Response time (p95) to see when the site starts slowing down.
    website load testing step 6 4 test run response time
  1. What to look for
  • If response times rise steadily or error rates spike as users increase, that’s the system approaching its limit.
  • If the graphs stay flat and green at 10 users, your static site handled the load this time.

Step 7 — Generate and Access Your AI Report

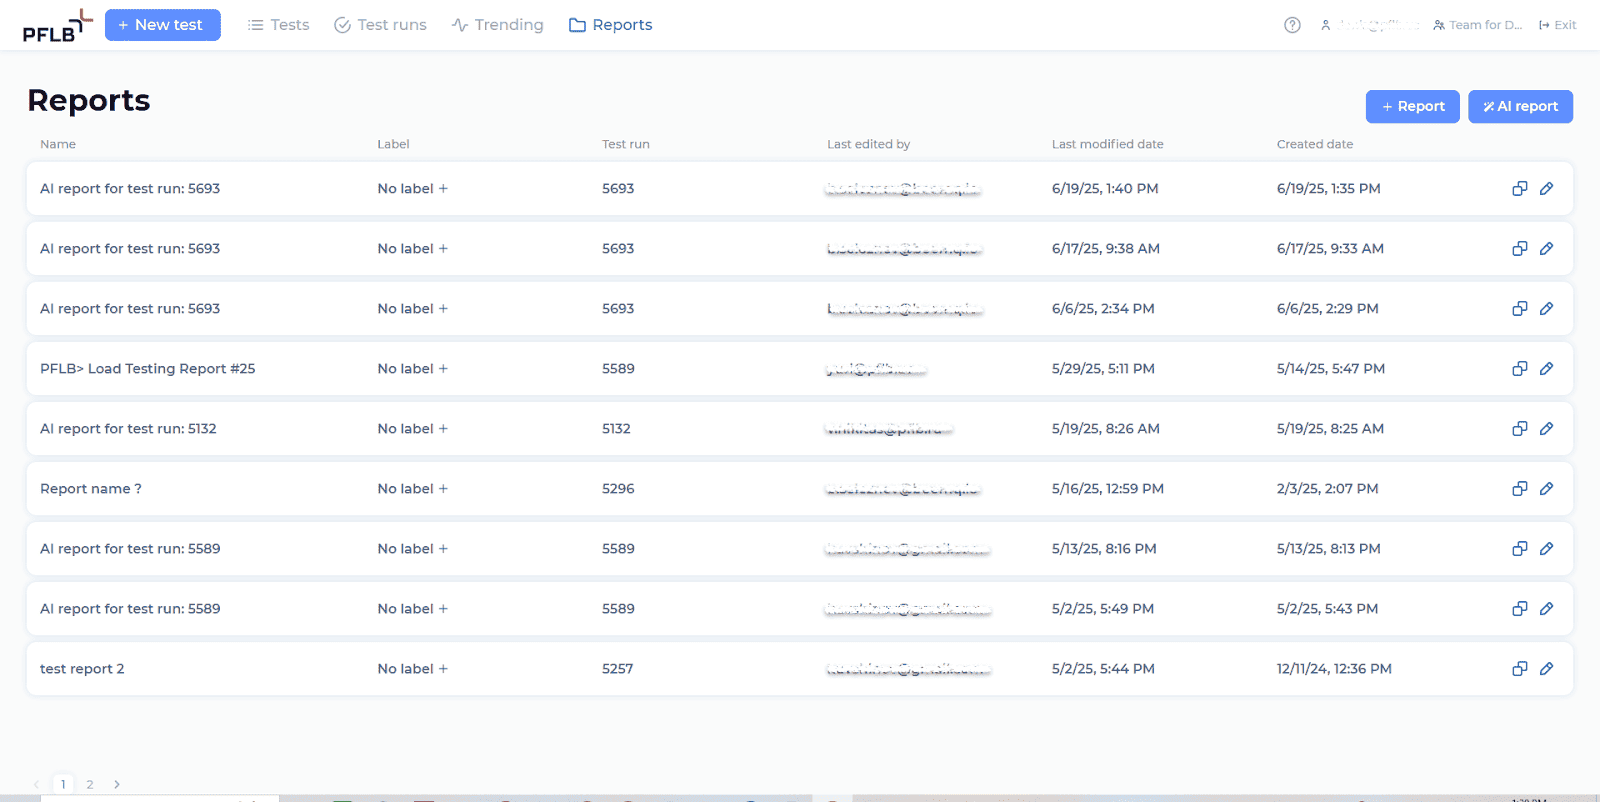
Once your test run is completed, follow these steps to generate your AI-powered report:Click on the “Reports” tab at the top of your screen.

website load testing step 7 1 reports

On the Reports page, click the “AI report” button.

website load testing step 7 2 ai report button

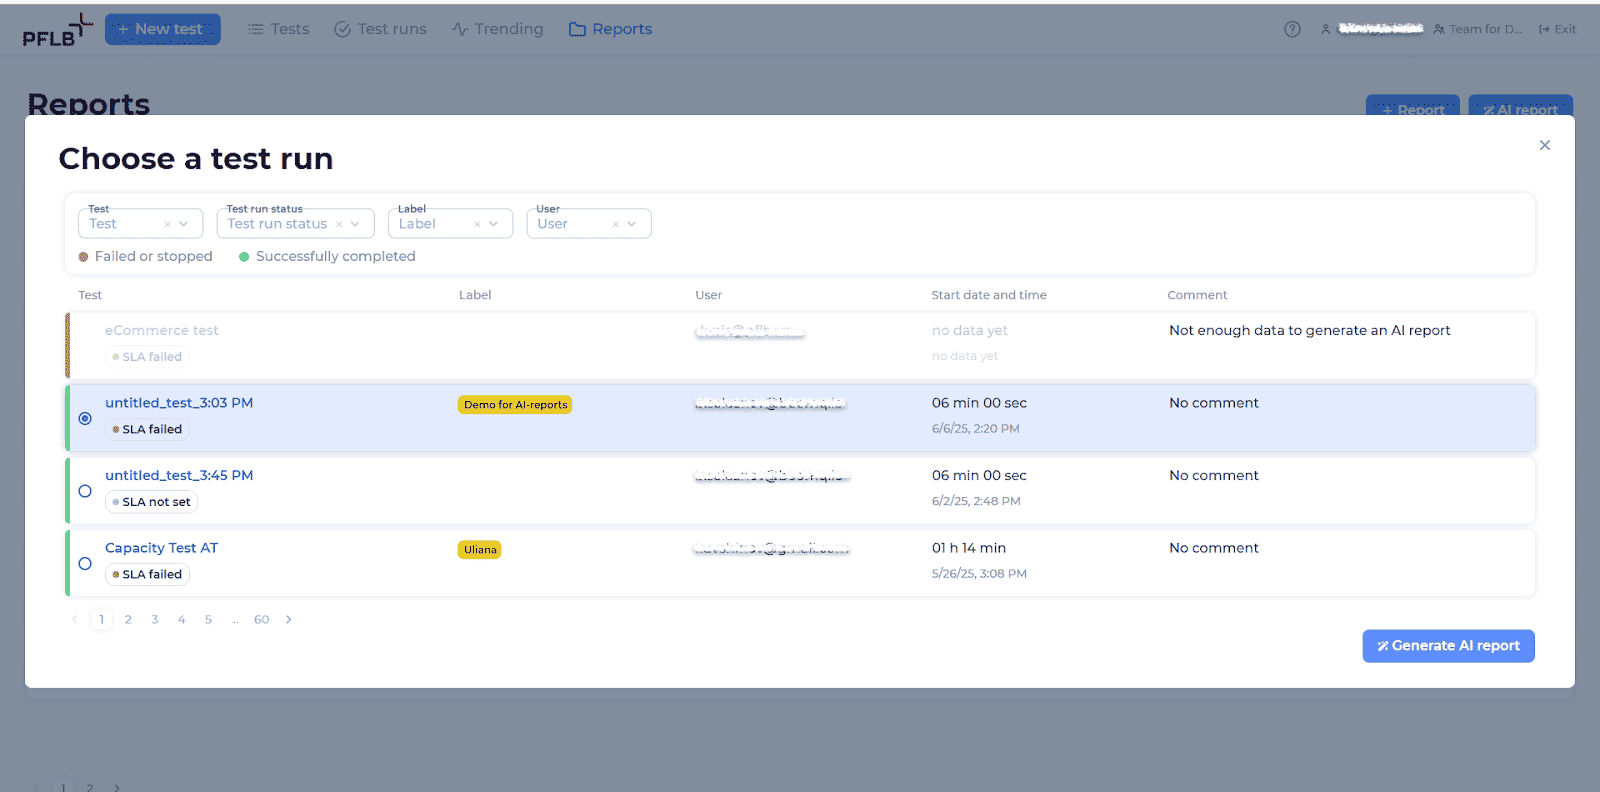
From the pop-up window, select the completed test run for which you want a report, then click on “Generate AI report”.

website load testing step 7 3 generate ai report

The platform will begin analyzing your test data automatically. This process may take a few minutes, during which you’ll see the status as “Might take a few minutes”.

Once your report is ready, you’ll receive a notification. Return to the “Reports” tab and find your newly created AI report in the list.
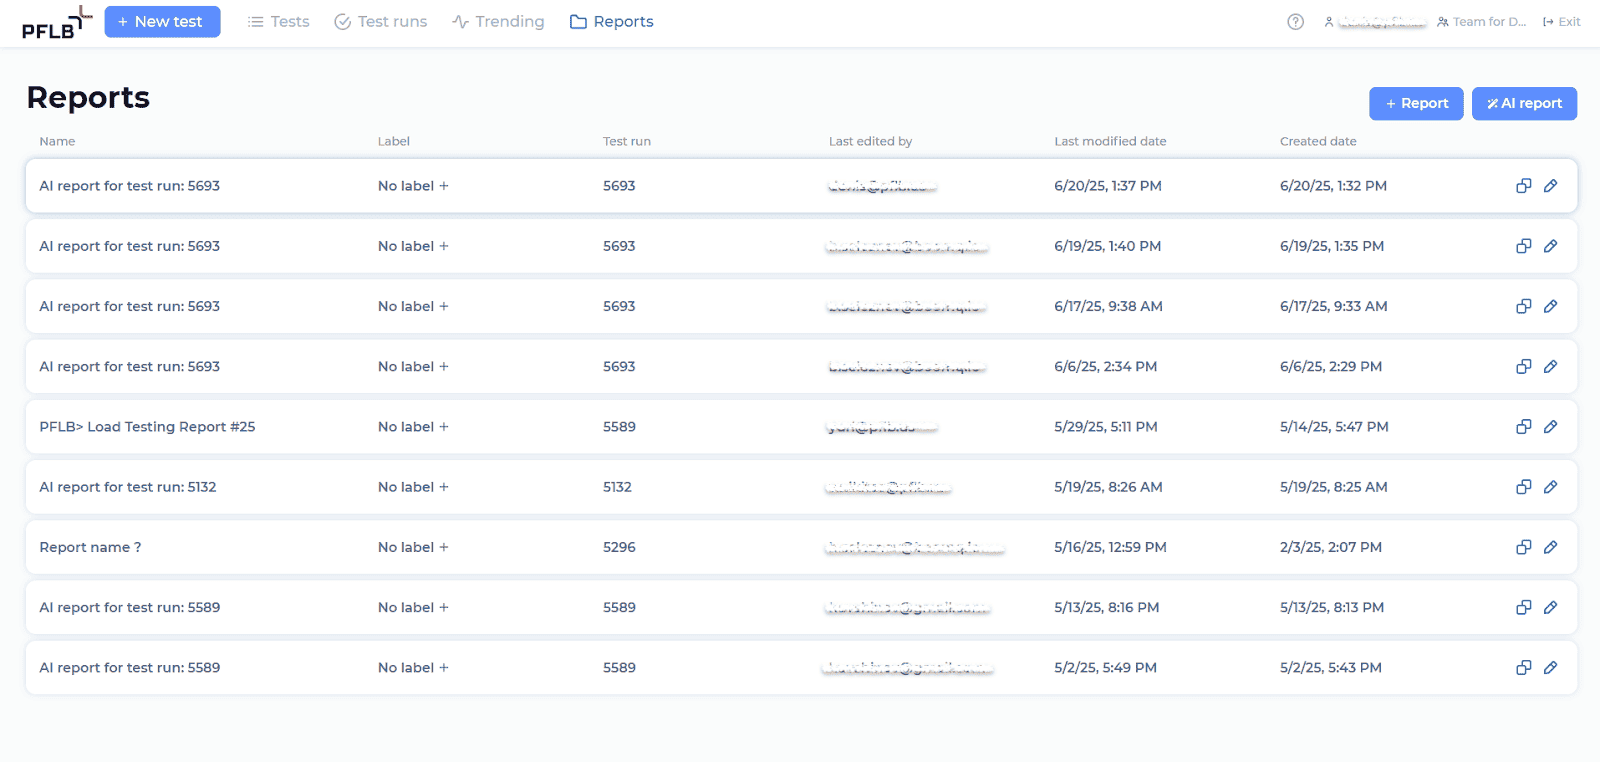
website load testing step 7 4 reports ai report

Click and open it.

Your AI-generated performance analysis, complete with insights and recommendations, is now ready to review and share with your team.

What’s Next?

With PFLB’s free tier (10 VUh), QA engineers can run a meaningful test and extend their capabilities beyond functional verification. Once comfortable, you can scale up to larger tests, adjust workload models, and integrate PFLB into continuous integration pipelines.

Have Questions Left Unanswered?

Table of contents

    Related insights in blog articles

    Explore what we’ve learned from these experiences
    5 min read

    Swagger API Testing: What It Is, How It Works, and Best Practices for QA Teams

    swagger api testing preview
    Oct 28, 2025

    Testing APIs without proper documentation can feel like walking through fog — every endpoint is a guess, every parameter a risk. But not with Swagger UI API testing. Swagger turns static API definitions into a live, interactive interface where developers and QA teams can validate endpoints, check request/response schemas, and explore the system in real […]

    6 min read

    BlazeMeter vs. JMeter: Full Comparison

    blazemeter jmeter comparison
    Oct 24, 2025

    Ever wondered whether you should stick with Apache JMeter or move your tests to BlazeMeter? Both tools are powerhouses in performance and load testing, but they serve different needs. JMeter is an open-source desktop tool under the Apache 2.0 license; ideal for local or distributed testing across HTTP, APIs, JDBC, and more. BlazeMeter, on the […]

    9 min read

    Endurance Testing: What It Is, Types & Examples

    endurance testing preview
    Oct 22, 2025

    When performance engineers talk about endurance testing, they usually mean soak testing — a long-duration performance test that keeps the system under a steady, realistic workload for hours or even days. It’s designed to uncover what short stress or load tests can’t: slow memory leaks, growing queues, or throughput that quietly drops overnight. By tracking […]

    12 min read

    Top 5 AI Load Testing Tools in 2025: Smarter Ways to Test Performance

    ai load testing tools preview
    Oct 17, 2025

    AI is quickly becoming the most overused promise in software testing — every platform now claims it, but few can prove it.Some “AI load testing tools” genuinely analyze data, learn from patterns, and generate meaningful insights. Others stop at fancy dashboards and static scripts dressed in new terminology. In this comparison, we’ll separate real machine […]

  • Be the first one to know

    We’ll send you a monthly e-mail with all the useful insights that we will have found and analyzed