

In today’s digital ecosystem, APIs form the backbone of diverse software applications, facilitating communication and data exchange for an interconnected digital world. However, as demand for these services grows, ensuring their robustness and ability to handle varying levels of traffic becomes crucial. This is where PFLB, a next-generation, cloud-based load testing tool, comes in. In this guide, we’ll walk you through how to load test an API using PFLB, highlighting how its cloud-based nature provides unparalleled flexibility, scalability, and ease of use.
Table of Contents
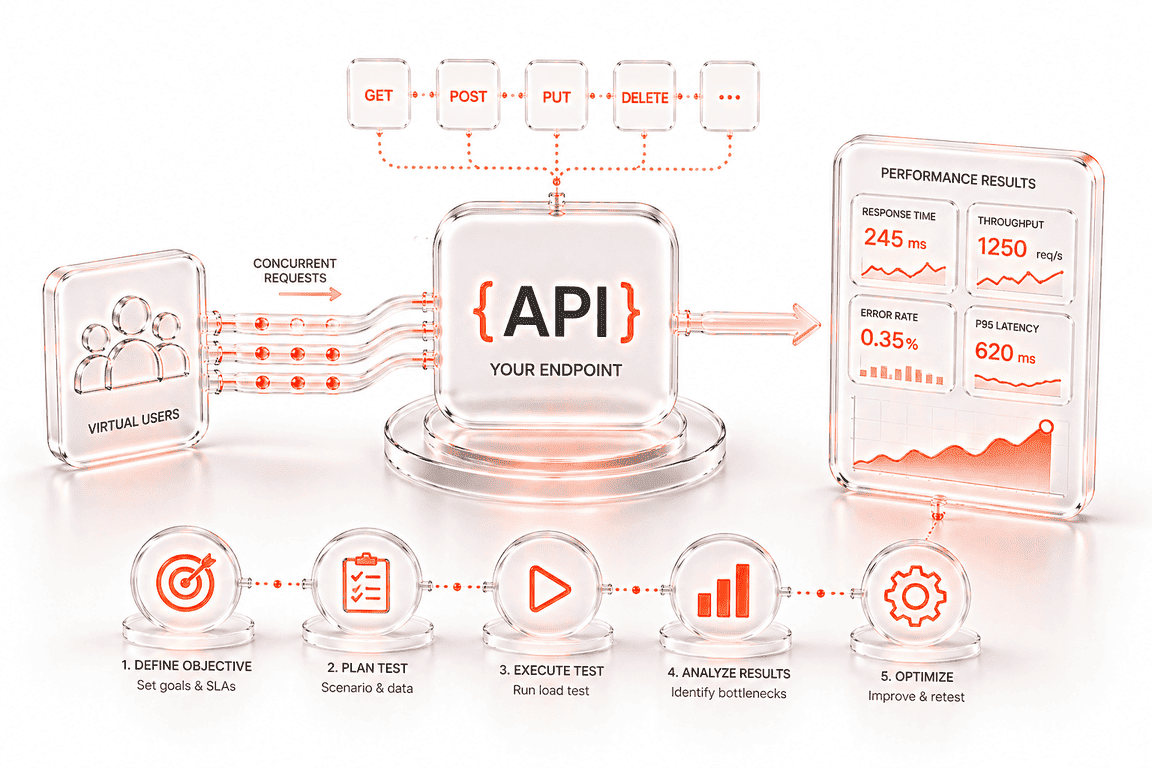
Understanding API Load Testing
API Load Testing is the process of simulating a specific number of concurrent API requests, referred to as traffic, to evaluate how an API performs under varying levels of load and identify its capacity to handle requests without compromising performance, security, or availability.
API performance is a cornerstone of the user experience. Slow or unreliable APIs can lead to frustrated users, decreased engagement, and potential revenue loss. Ensuring robust API performance enhances reliability, reduces response times, and guarantees seamless interactions, creating a positive experience for end users.
Key Reasons to Perform API Load Testing
- Ensure Stability: Validate that your API can maintain performance during traffic spikes or prolonged heavy use.
- Identify Bottlenecks: Pinpoint areas of your infrastructure or API failure that might slow down or fall under pressure.
- Optimize Scalability: Test the API’s ability to scale up to meet growing traffic demands.
- Enhance User Experience: Reduce response times and improve reliability, ensuring a seamless experience for users.
When Should You Perform Load Testing?
Load testing should be performed at various stages of your API’s lifecycle:
- Pre-launch: Test under real-world conditions before your API goes live.
- Post-update: Ensure new features or changes do not negatively affect performance.
- During Continuous Development: Integrate load testing into your CI/CD pipeline for ongoing optimization and monitoring.
- Post-scaling: Verify that increased infrastructure capacity can handle traffic without issues.
API Load Testing in 6 Key Steps
This section outlines a straightforward process for setting up and executing an API load test using the PFLB API load testing tool. While PFLB is highlighted for its features, you are free to select other tools that suit your specific needs. For a detailed comparison of the best API load testing tools, refer to this article. Each step is carefully explained and supported with visual aids to ensure clarity and ease of implementation.
This guide not only explains how to load test REST API but also provides insights applicable to other API types such as SOAP, WebServices, gRPC, and GraphQL. No matter the API type, the principles and techniques outlined here will help ensure optimal performance and reliability.
Step 1: Define Clear API Load Testing Goals
Before starting a test, establish measurable objectives that outline exactly what you aim to achieve. This ensures clarity and actionable insights during testing.
- Quantify Traffic Peaks: Specify the number of requests or user sessions to emulate during peak periods and define their duration.
- Define Test Scope: Identify which APIs need to be tested more or less intensively.
- Set Performance Benchmarks: Establish acceptable response times and thresholds for success or failure.
- Detail Usage Patterns: Outline realistic traffic scenarios that reflect real-world usage. At this phase, it can be beneficial to analyze production traffic patterns. PFLB offers a Google Analytics integration that allows you to clone real production traffic patterns, ensuring your tests accurately reflect real-world conditions.
- Account for Dependencies: Include third-party integrations or dependent services to ensure seamless interactions.
By setting precise goals, you can align your testing parameters with real-world conditions and uncover actionable insights to enhance your API’s performance.
Step 2: Define a Suitable API Load Testing Environment
Using PFLB eliminates the need to manage your own load testing infrastructure, as its load generators are hosted in the AWS cloud and ready to use. However, you must prepare your test bench—the API you intend to test—to ensure the results are valid.
It’s essential to use a reliable infrastructure for testing. Some teams prefer staging environments, while others clone production environments. If you clone production, take special care in managing data sharing. When third-party vendors are involved, sanitize sensitive data before granting access. PFLB offers an in-house data masking tool to help ensure your data’s security.
Additionally
Verify that the IP addresses of PFLB’s load generators are whitelisted if needed. This step is critical, as network providers often block high traffic from single IPs under IP throttling policies. Addressing these aspects ensures smooth and accurate load testing execution.
Step 3: Create Load Testing Scenarios
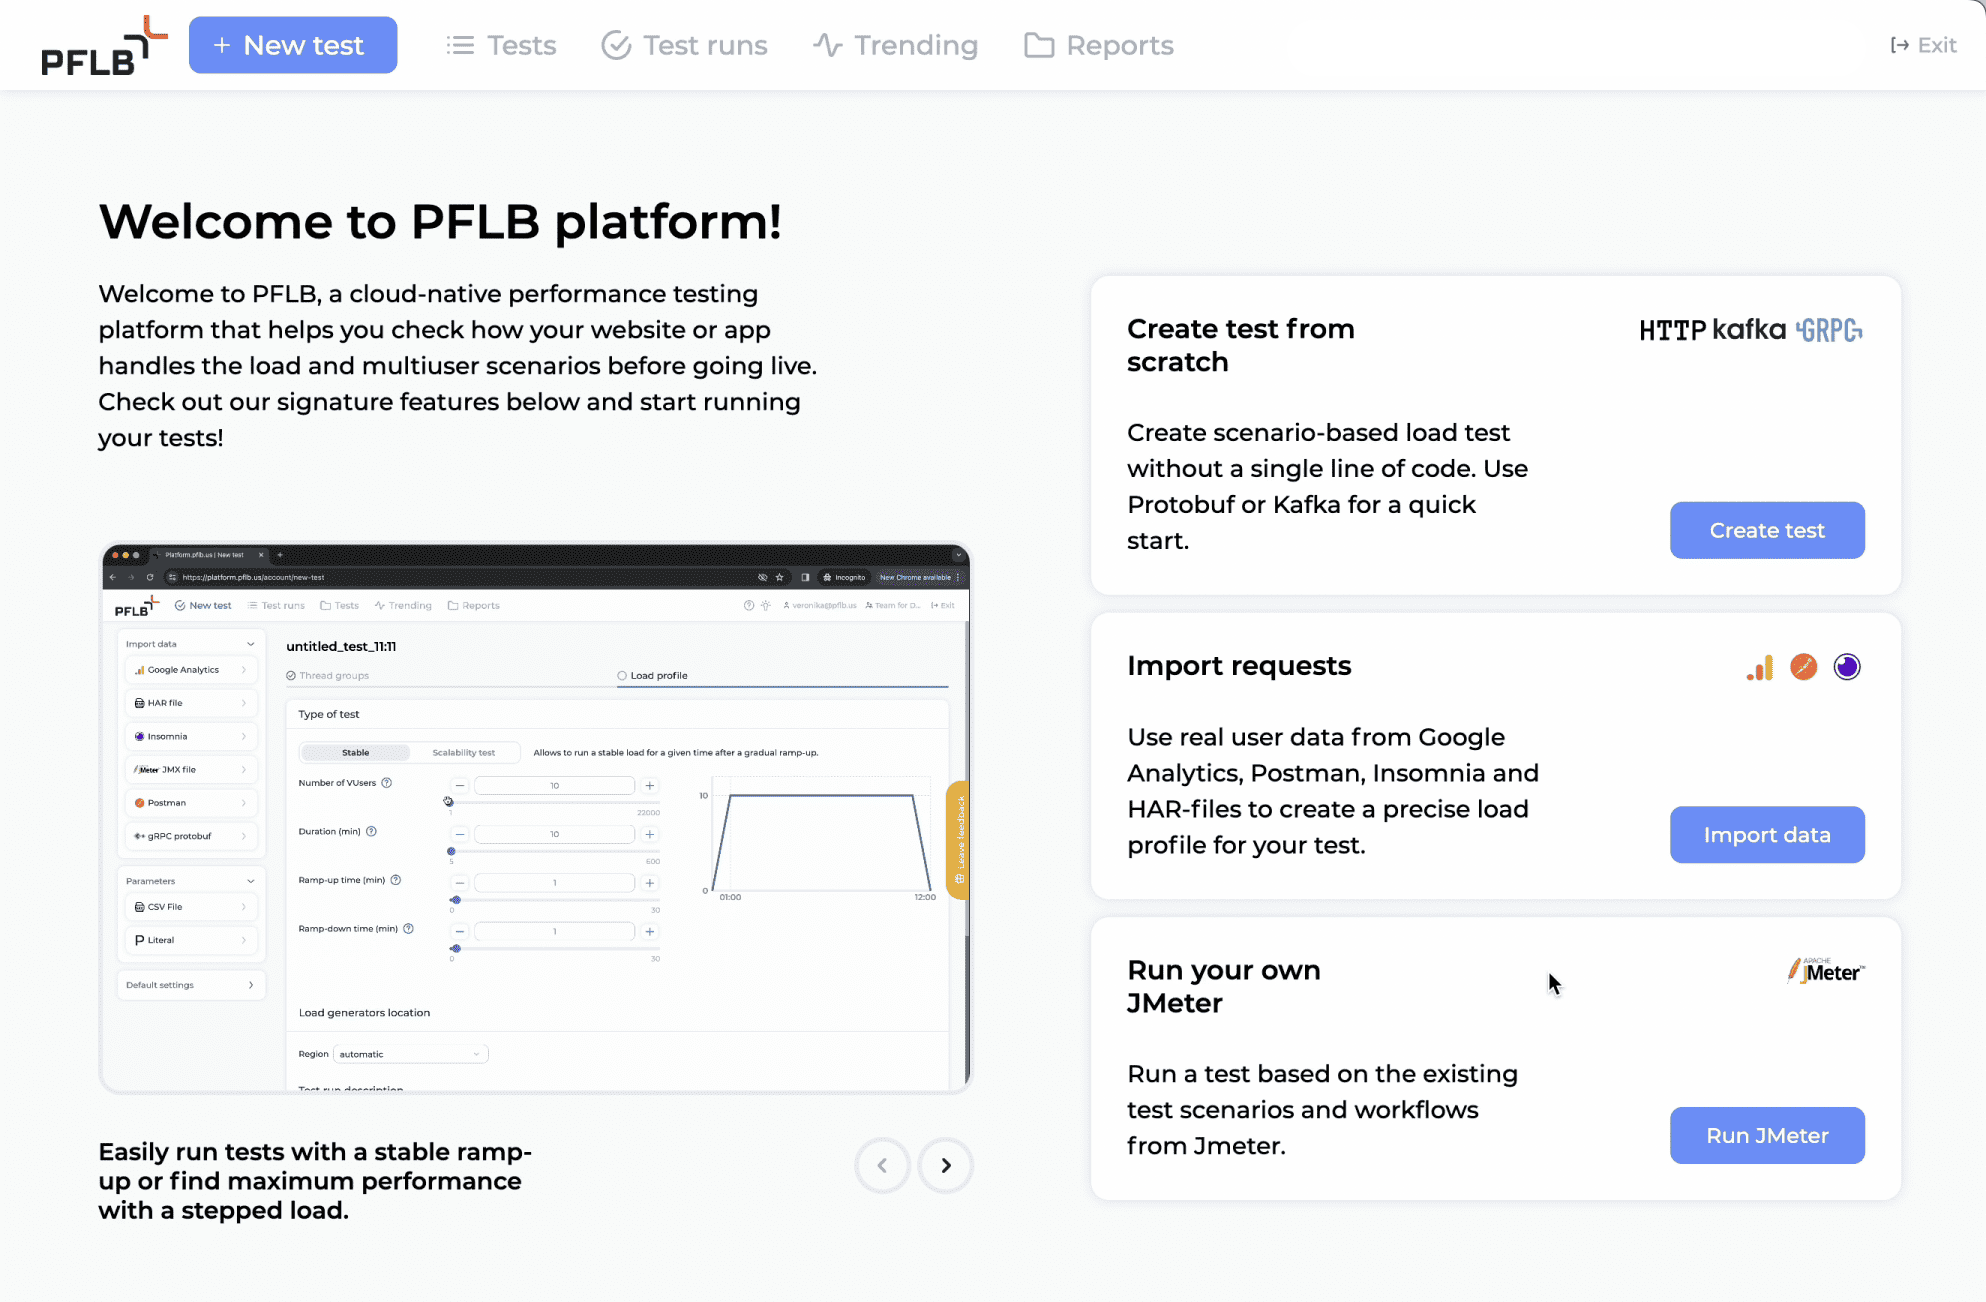
- Sign Up for PFLB: Sign up here. It’s free.
- Create a Test: Start from the welcome screen by clicking “Create a Test from Scratch.” In this guide, we will create a test from scratch. If you already have a request collection from Postman or Insomnia, importing it will save time, but the overall logic remains the same. Refer to the screenshot below for guidance:
- Build User Scenarios:
- Click “+ New Thread Group” in the no-code script builder to get started.
- Drag and drop an HTTP/HTTPS request into the transaction. A transaction refers to a logical group of requests that simulate a specific user action or workflow. For more details, see the PFLB documentation. Refer to the screenshot below for clarification:
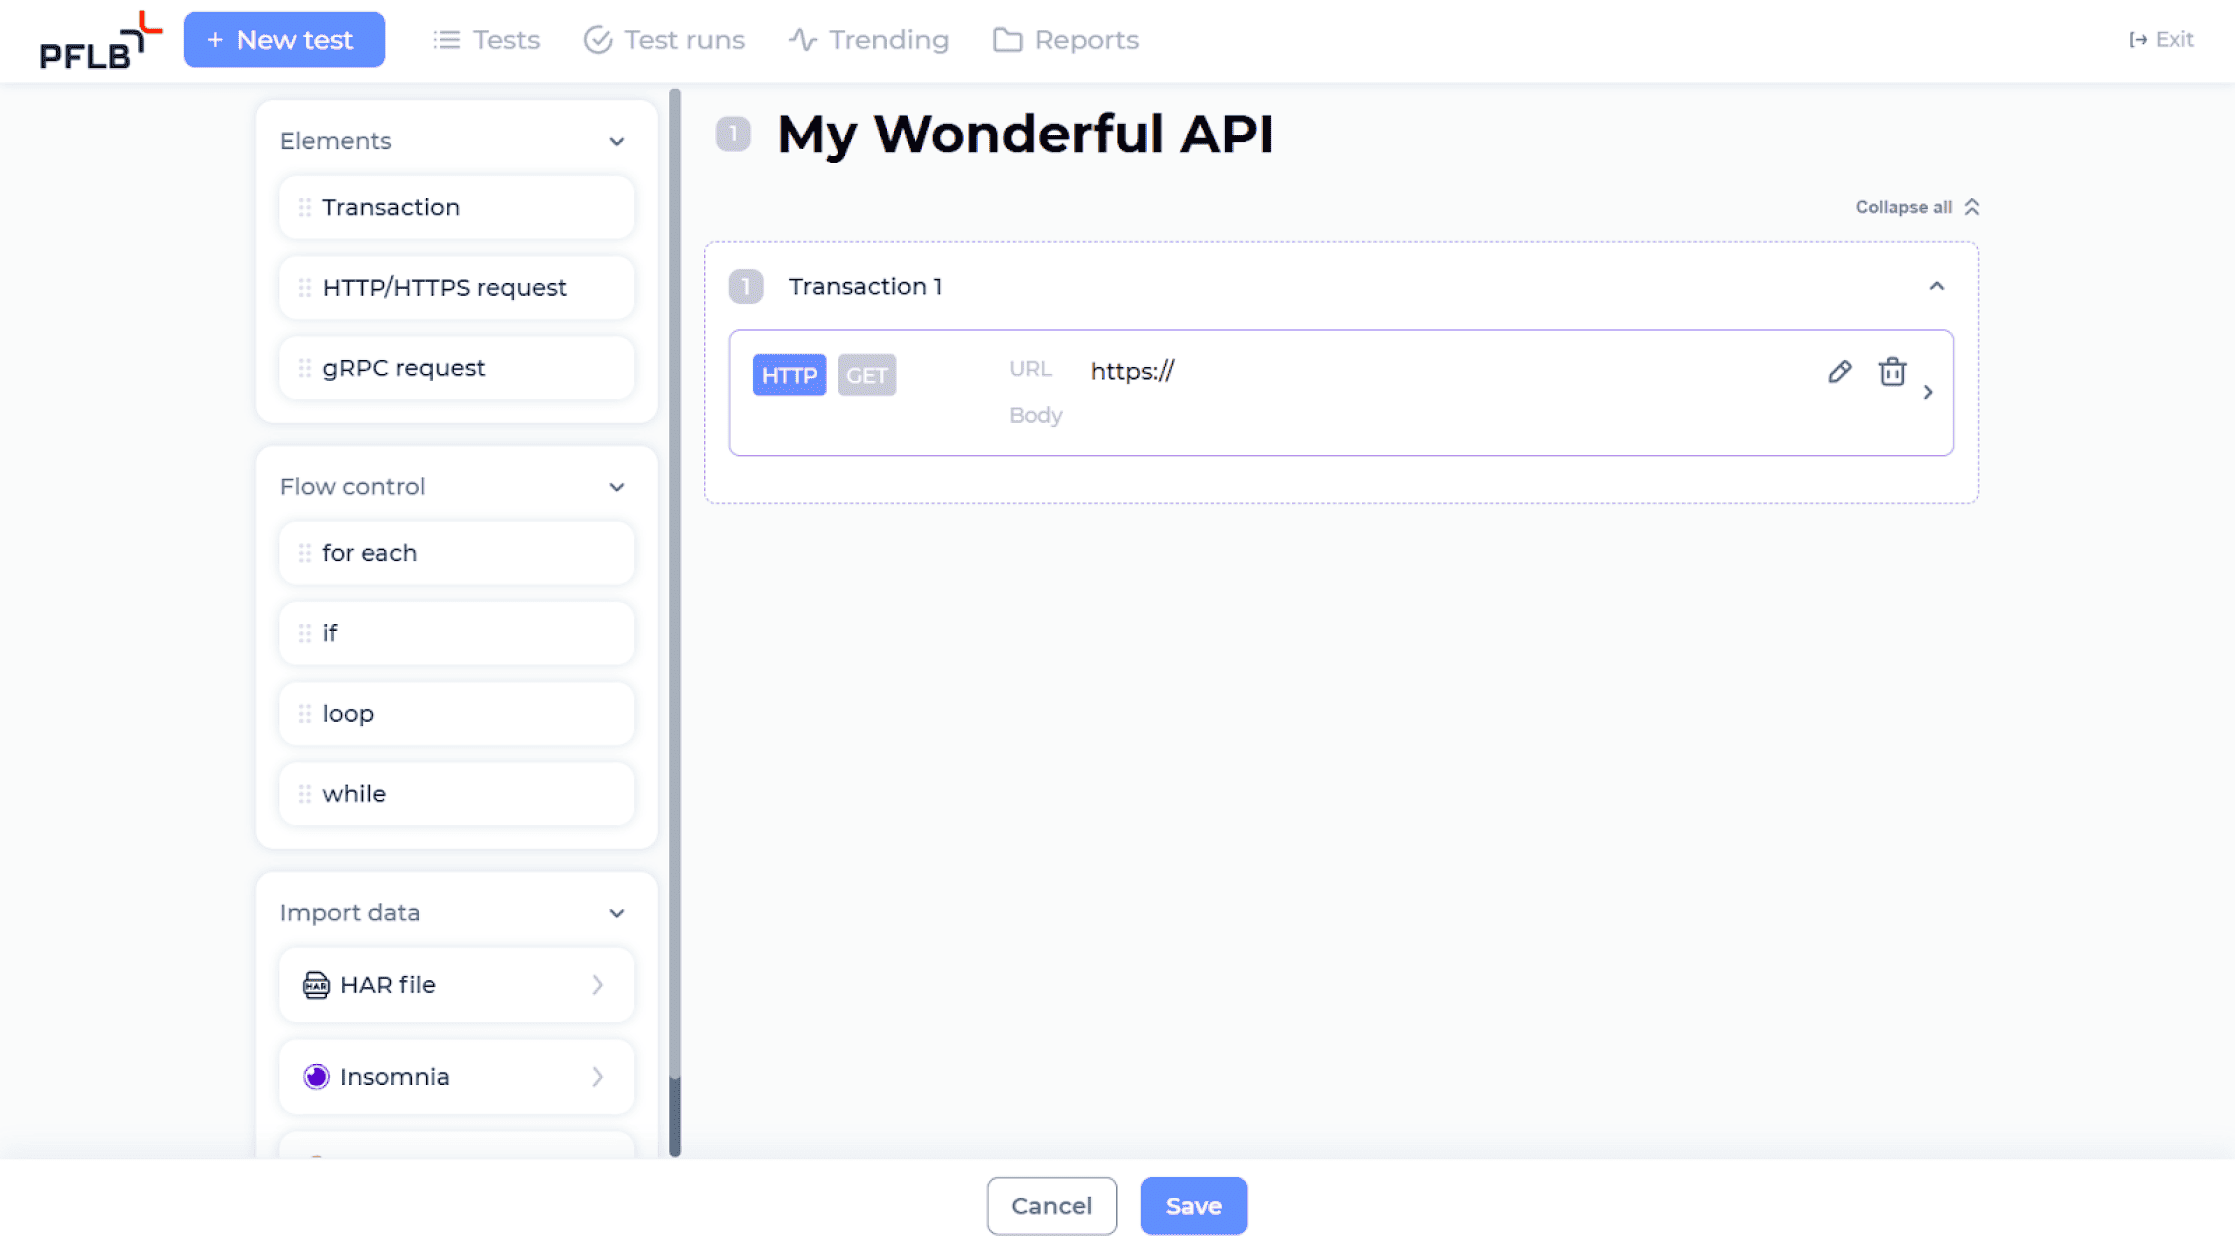
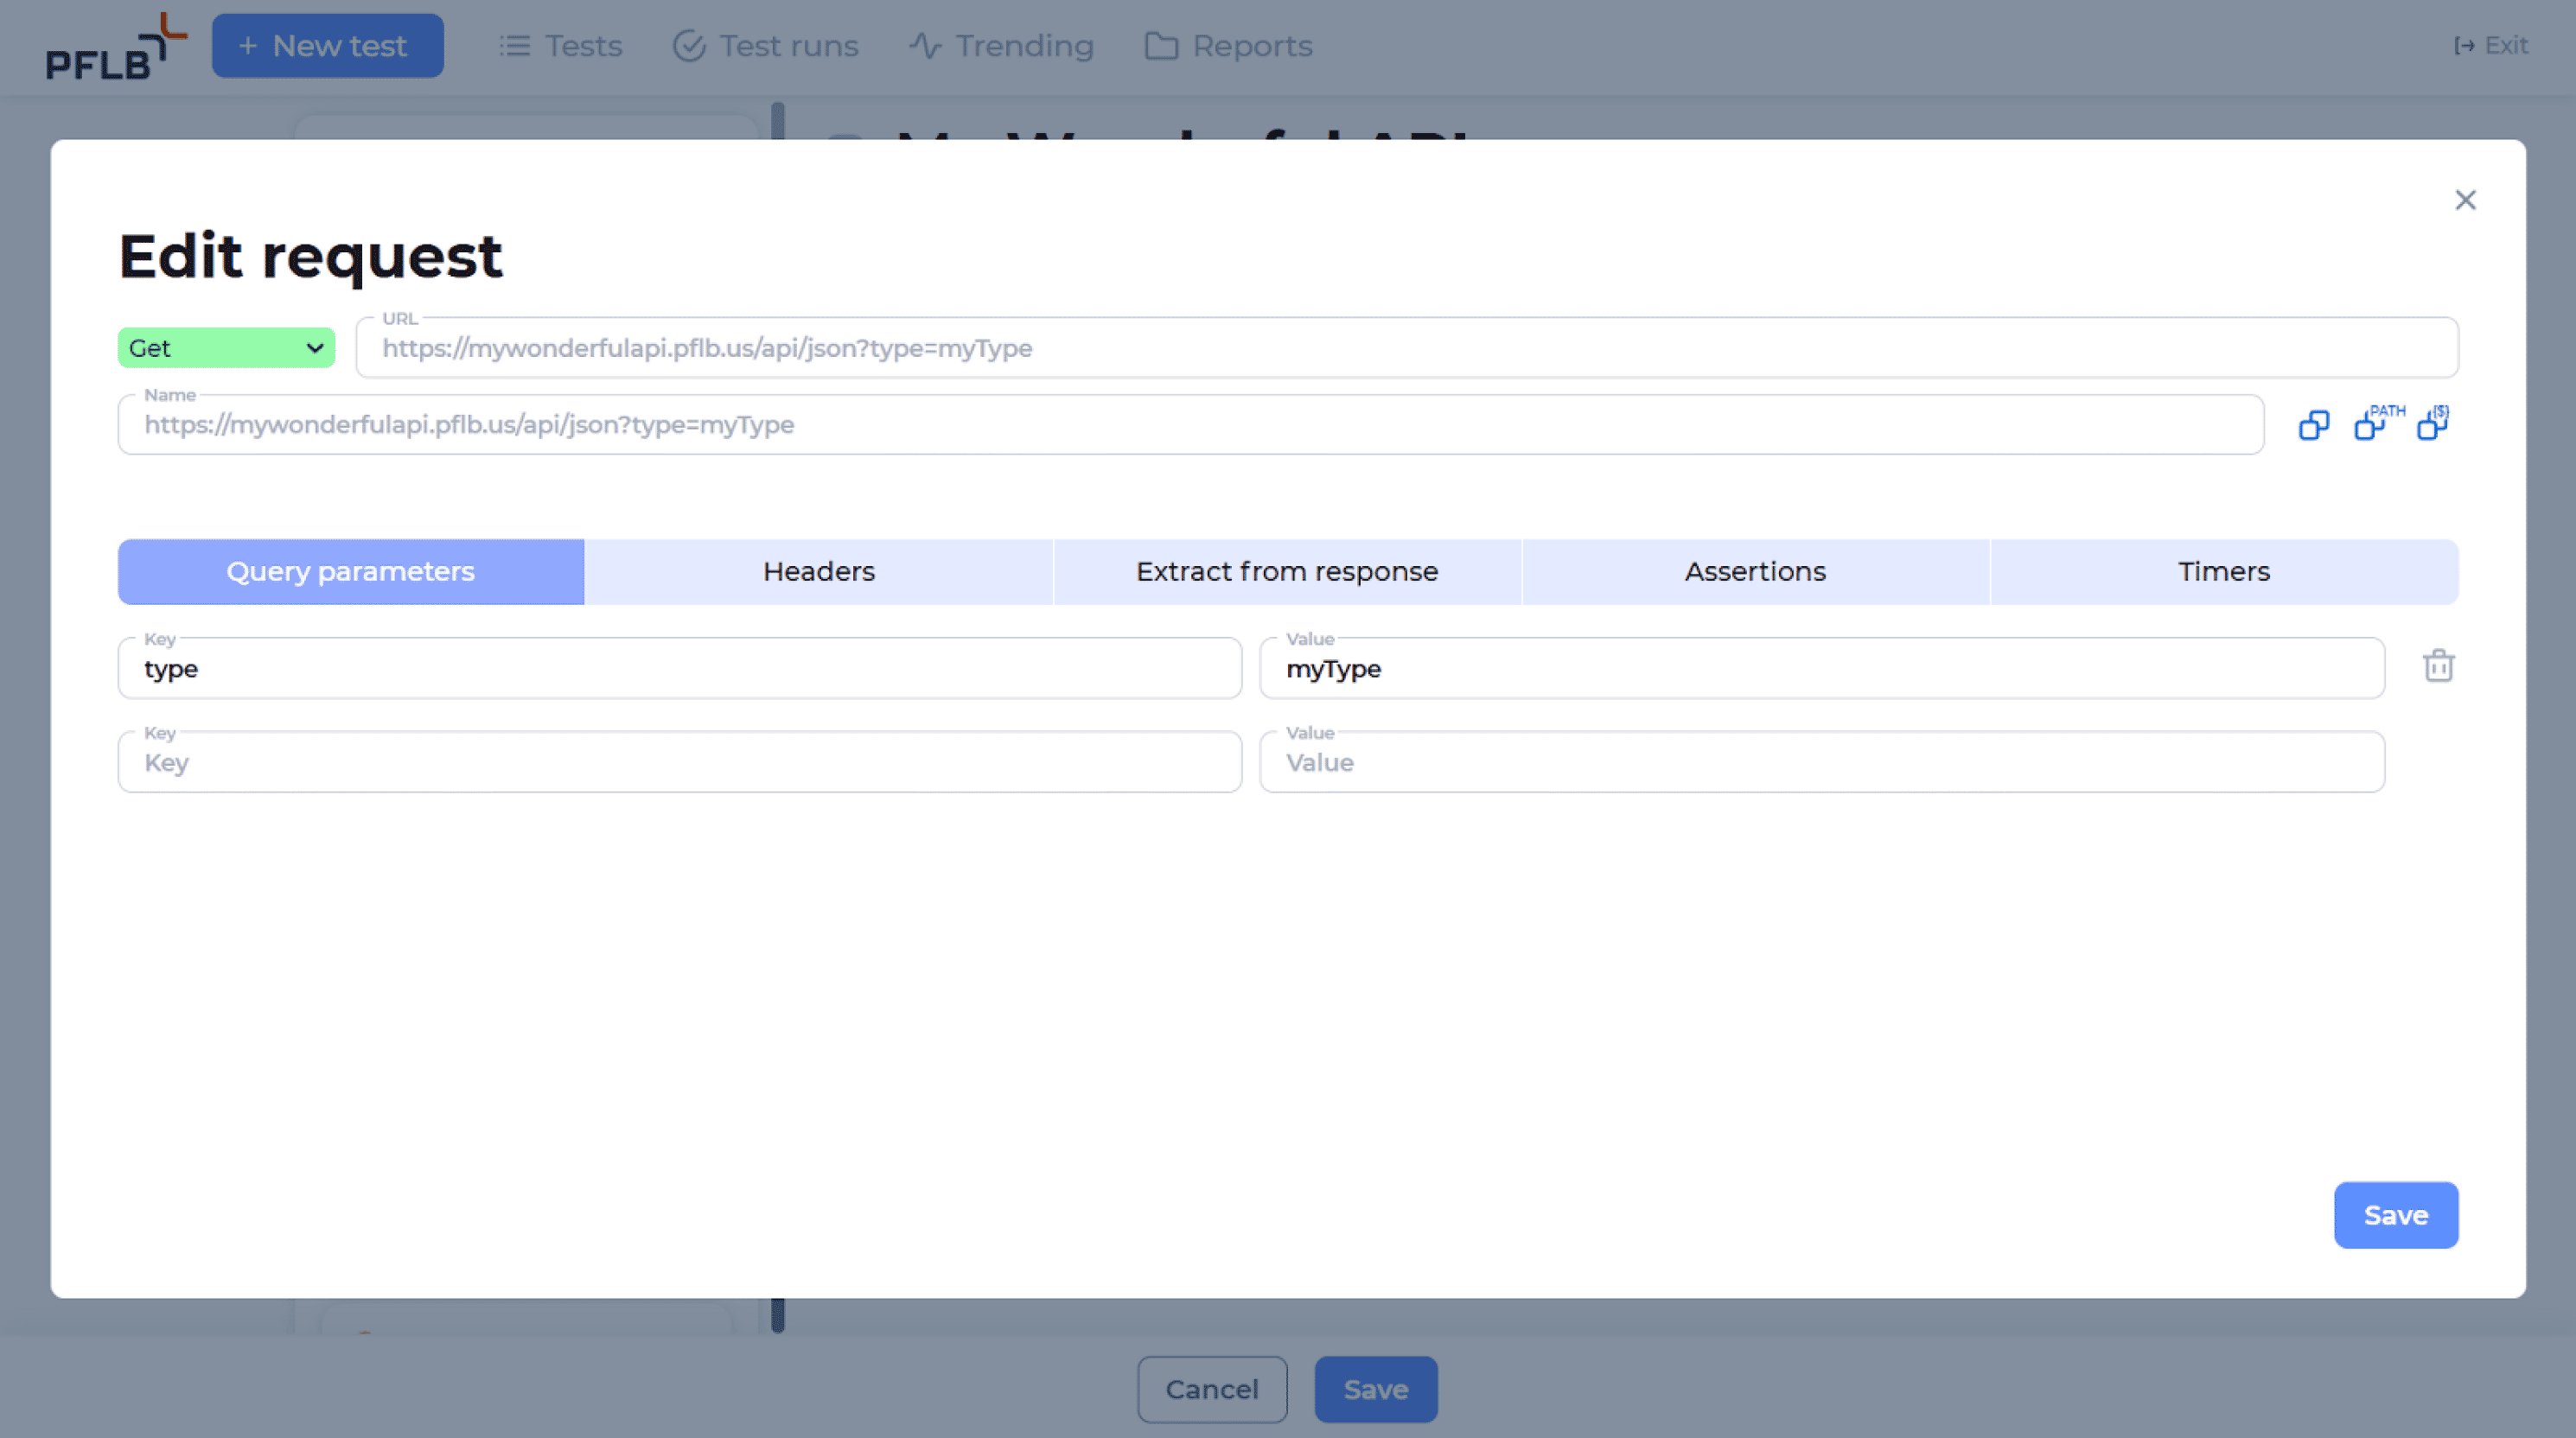
- Configure the request with the URL, HTTP Method, Query Parameters, Headers, and Body (if needed). Keep in mind that this step can be time-consuming. If you already have a collection of requests in tools like Postman or Insomnia, you can import them here to save time. Refer to the screenshot below for guidance:
- Parameterize Requests: Parameterization allows you to diversify requests by dynamically substituting variables into your requests. This is essential for simulating realistic user behavior, such as sending unique user IDs, session tokens, or other variable data in each request. You can set this up manually or by using datapools, which provide a structured way to handle multiple variables. For detailed instructions, refer to the PFLB documentation.
- Add Extractors: Extractors allow you to capture specific data from an API response and reuse it in subsequent requests. This is especially useful for dynamic workflows where session tokens, IDs, or other dynamic parameters are required. For example, you might extract an authentication token from a login response and include it in headers for subsequent API calls. To learn how to configure extractors, refer to the PFLB documentation.
- Add Assertions (Optional): Assertions ensure the correctness of your API responses by verifying that they meet predefined conditions during test runs. For example, you can check if a specific field in the response matches an expected value or if the HTTP status code is as intended. Assertions are critical for identifying functional errors under load. For detailed guidance, refer to the PFLB documentation.
- Save Progress: Ensure all configurations are stored.
- Define a Workload Distribution Model: In a load test, user scenarios (or thread groups) often need to run in specific proportions to simulate realistic traffic behavior. For example, one scenario may represent 80% of the traffic, while another represents 20%. Defining these proportions ensures your API stress test accurately reflects how users interact with your API under load. Use the provided interface to set these percentage values easily. Refer to the screenshot below for guidance.
The Users Profile Distribution option can be utilized for more advanced setups, such as defining unique load schedules for each group or use case. The PFLB documentation provides detailed instructions.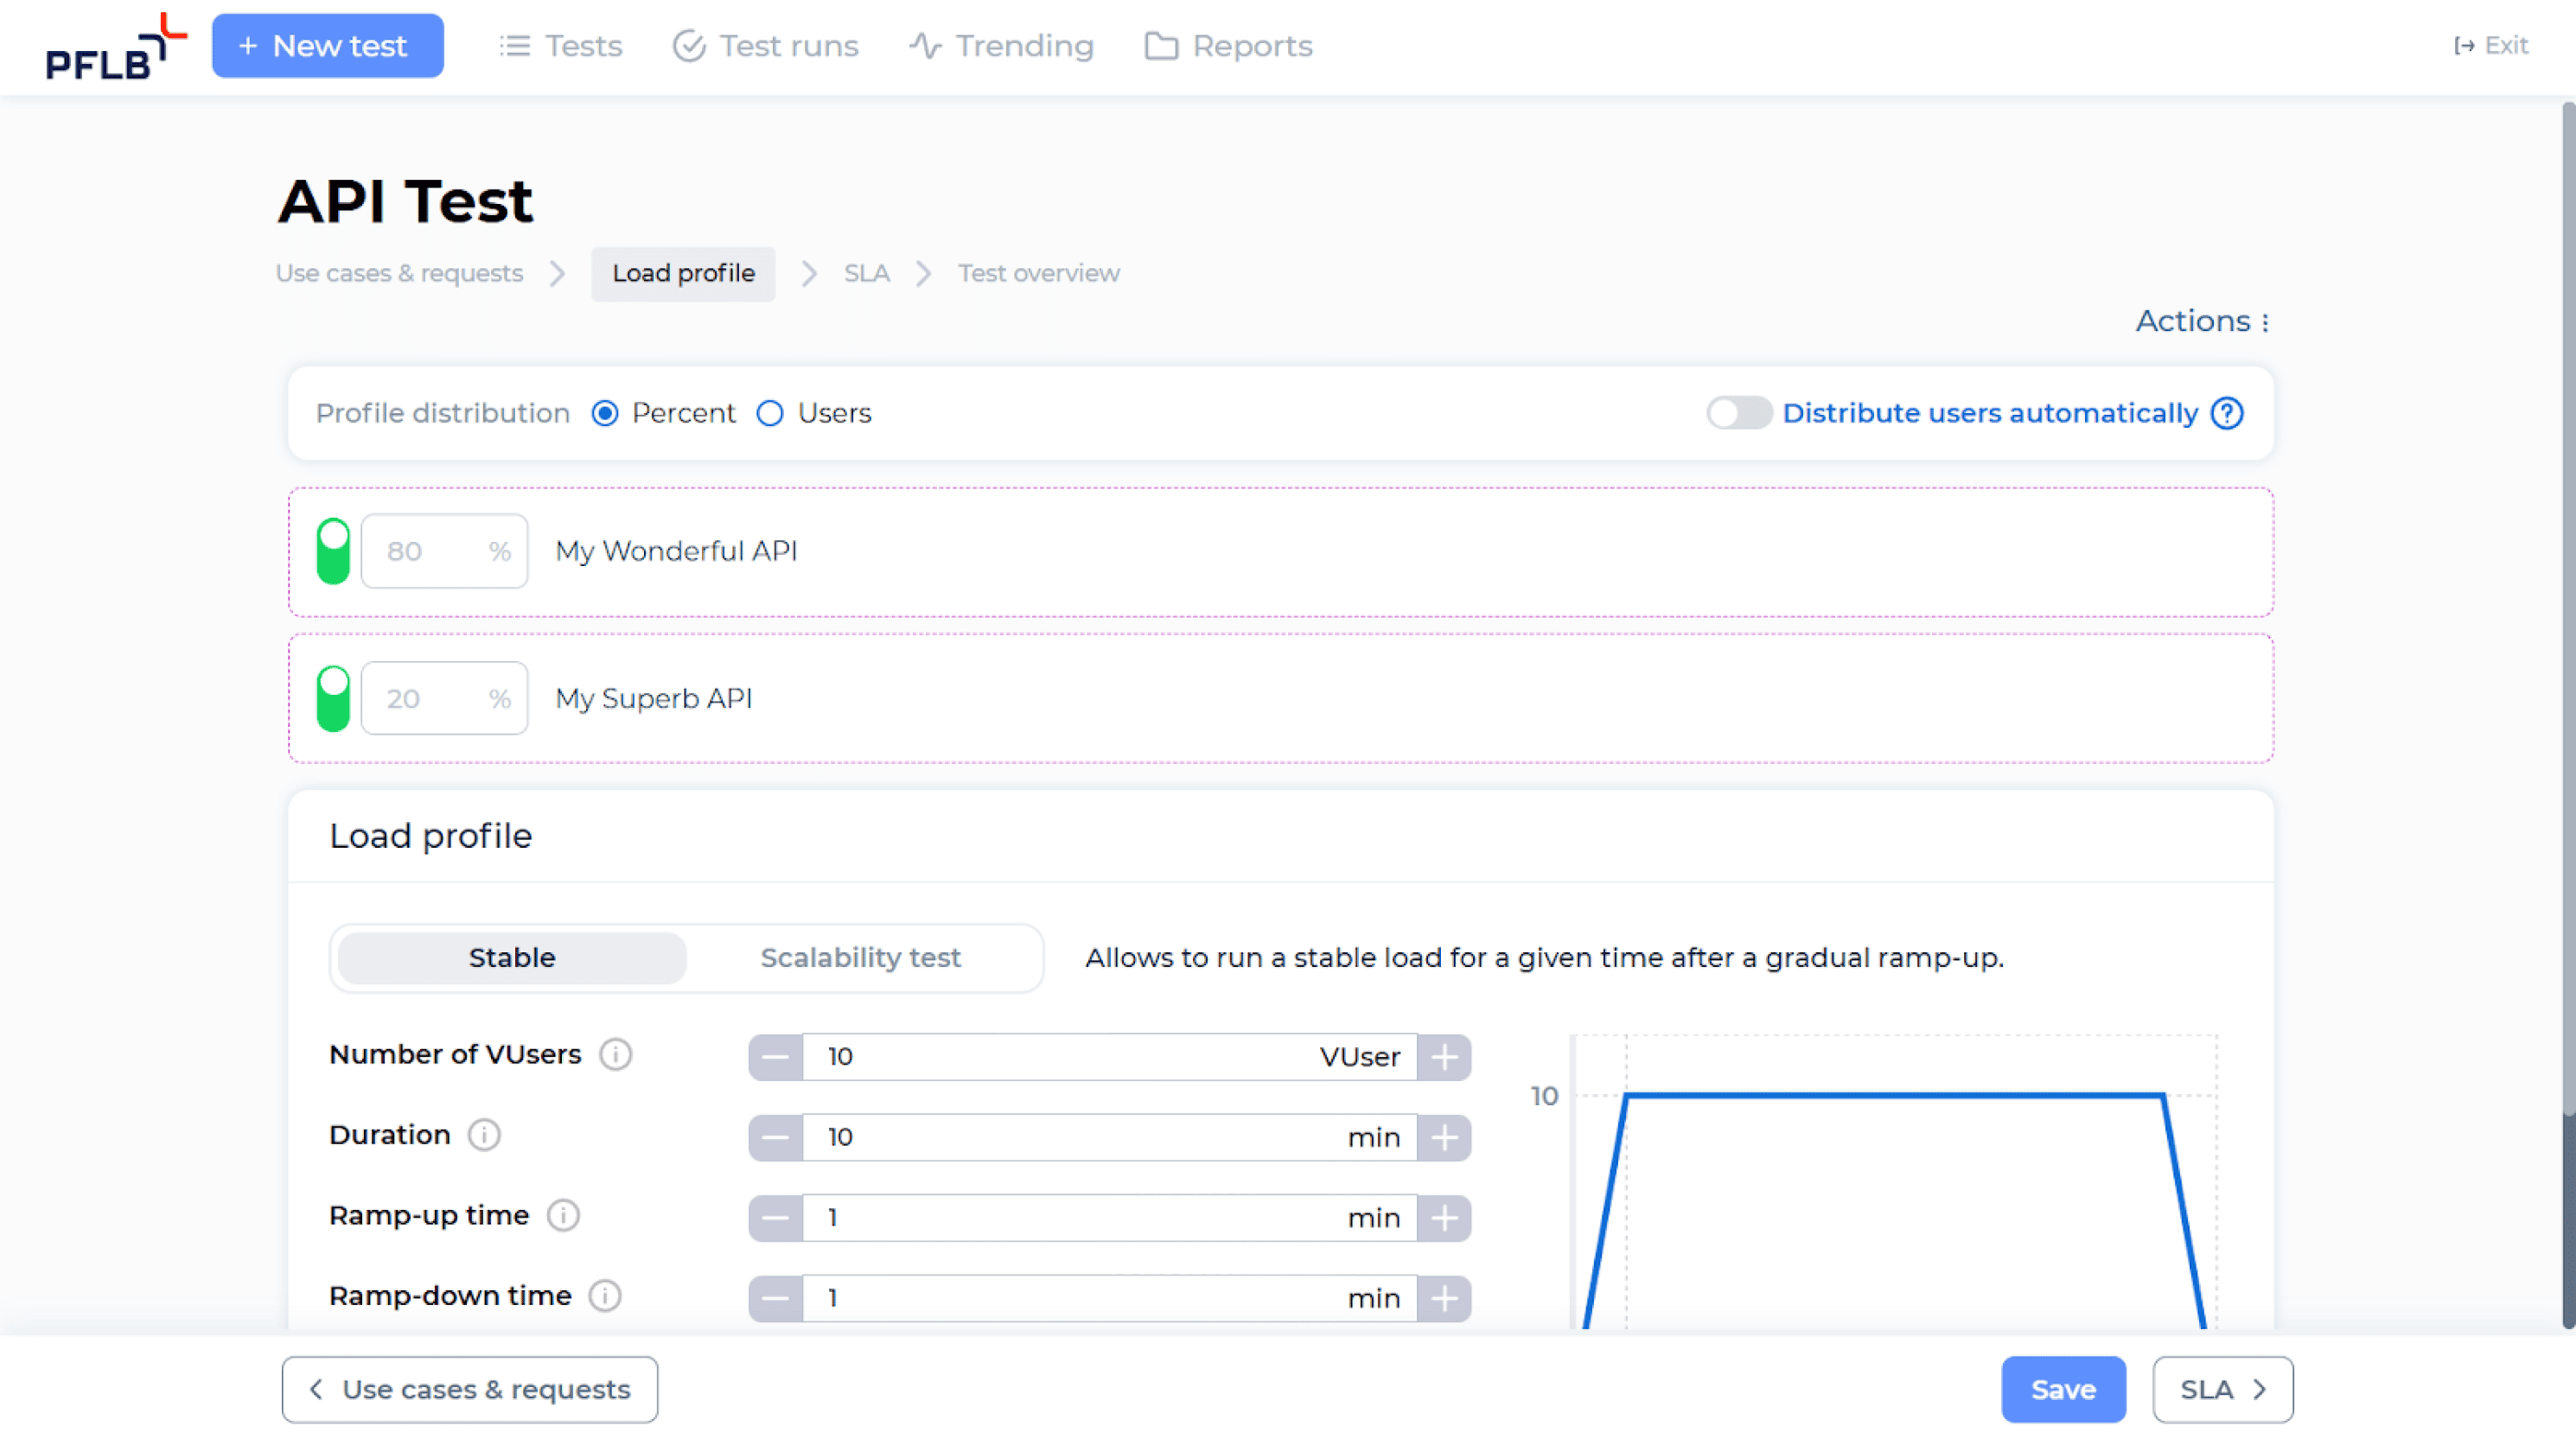
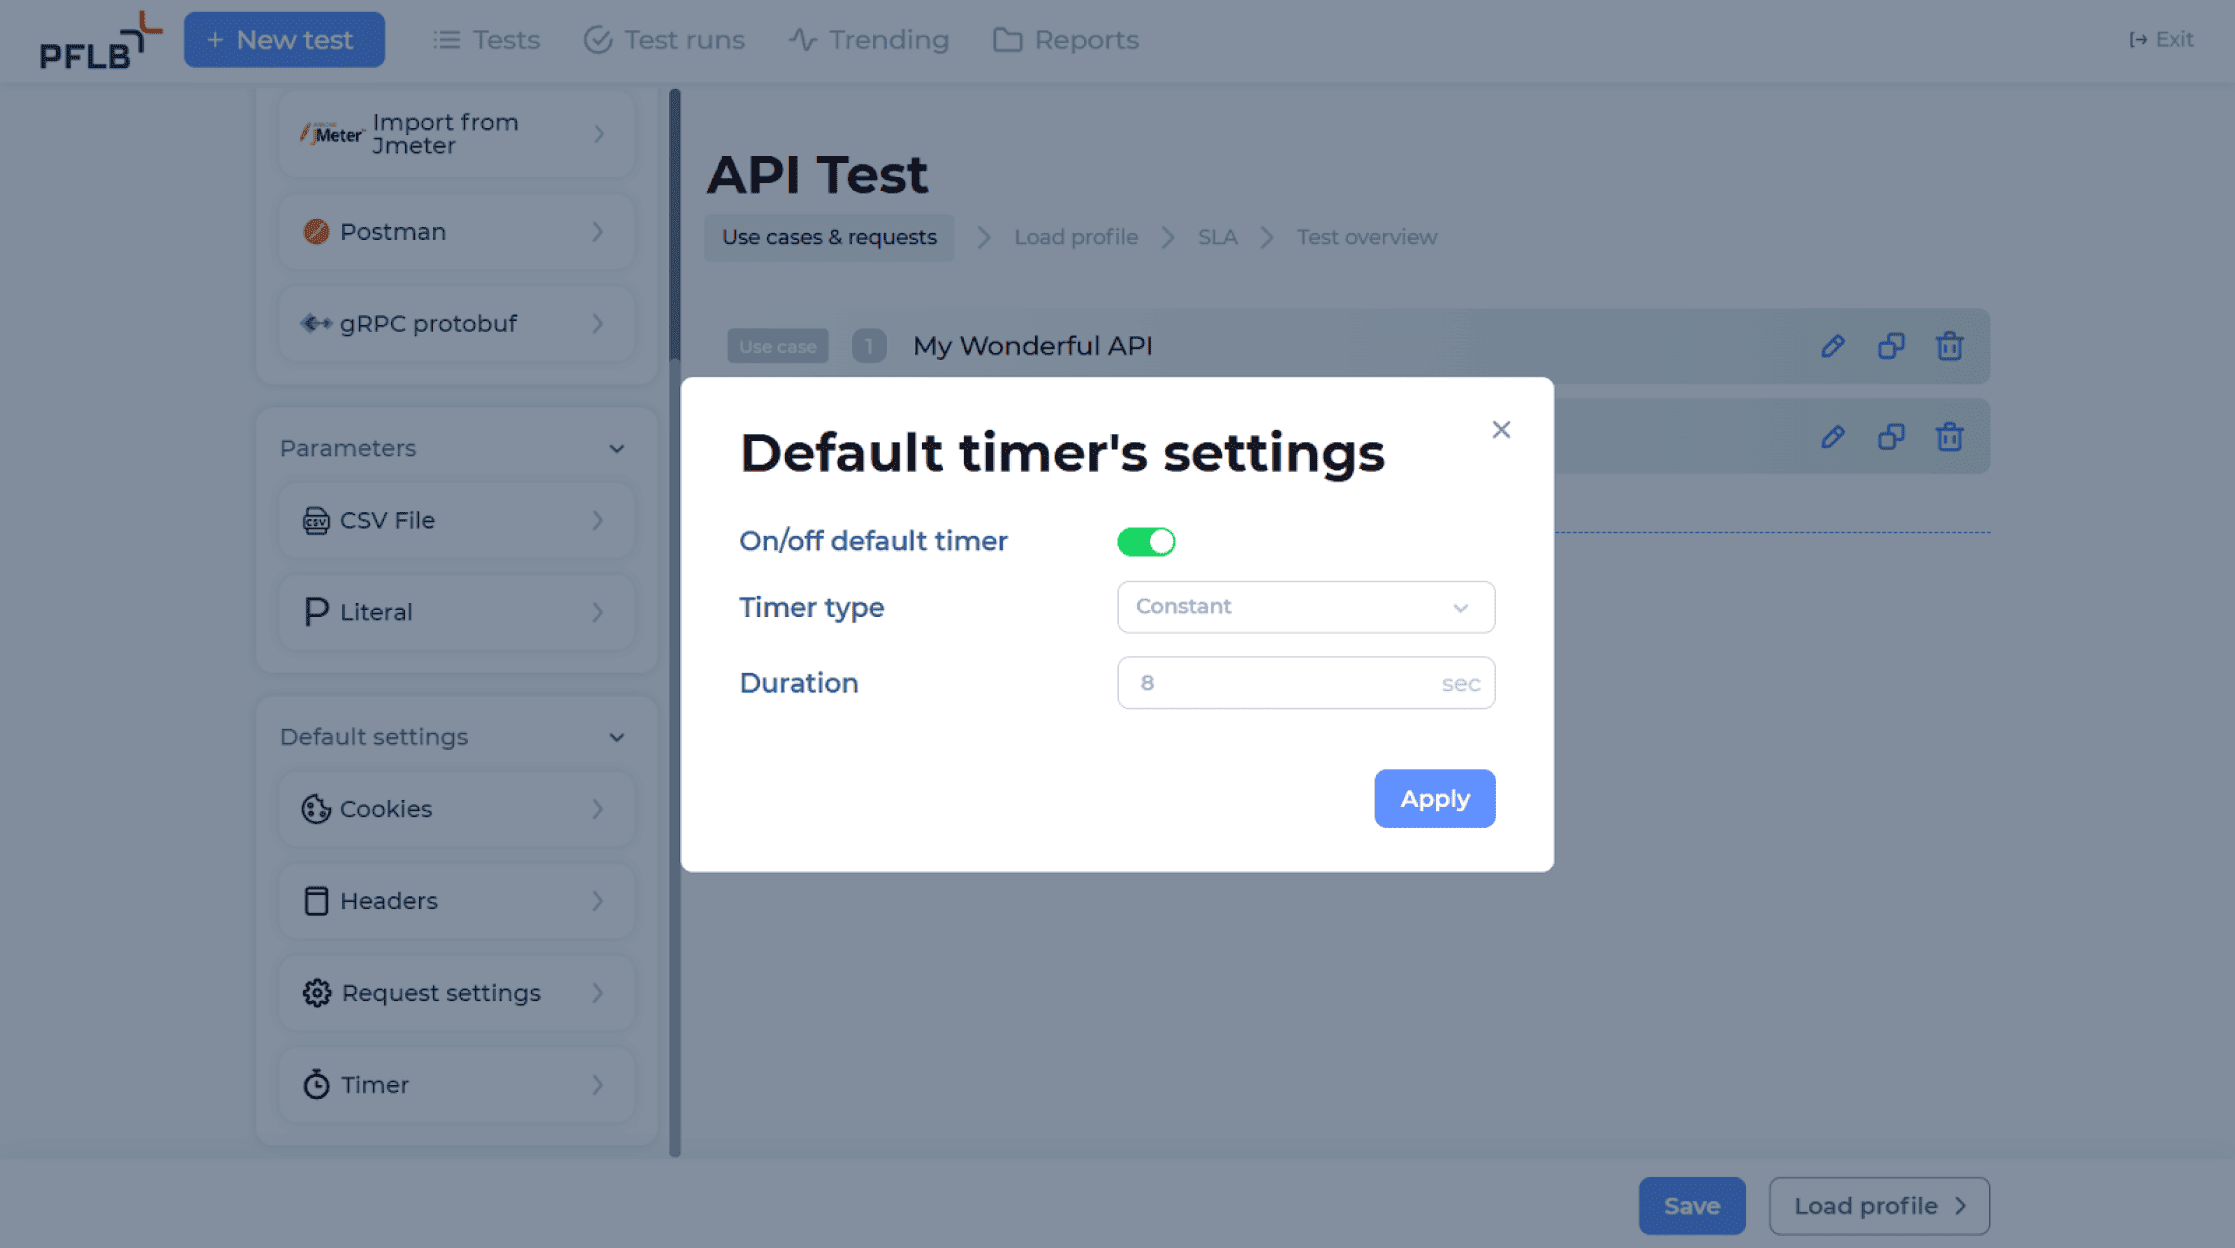
- Set Up a Global Timer (Optional): It is essential for simulating realistic user behavior during API stress testing. By defining pauses between subsequent requests, you mimic how users interact with an application in real-world scenarios, where actions are not instantaneous but occur at intervals. This setup helps create more accurate and meaningful test results, ensuring your API’s performance under realistic conditions. Refer to the screenshot below for guidance on configuring global timers.
Step 4: Configure Load Testing Parameters
- Set Load Profile Settings: Based on your testing goals, choose the test type (stable or scalability). Stable testing applies a constant load to evaluate how your API performs under a fixed number of concurrent requests. This helps ensure consistent performance during expected traffic levels.
Scalability testing, on the other hand, gradually increases the load to identify the maximum capacity your API can handle and uncover potential bottlenecks. Both approaches are critical for comprehensive performance evaluation.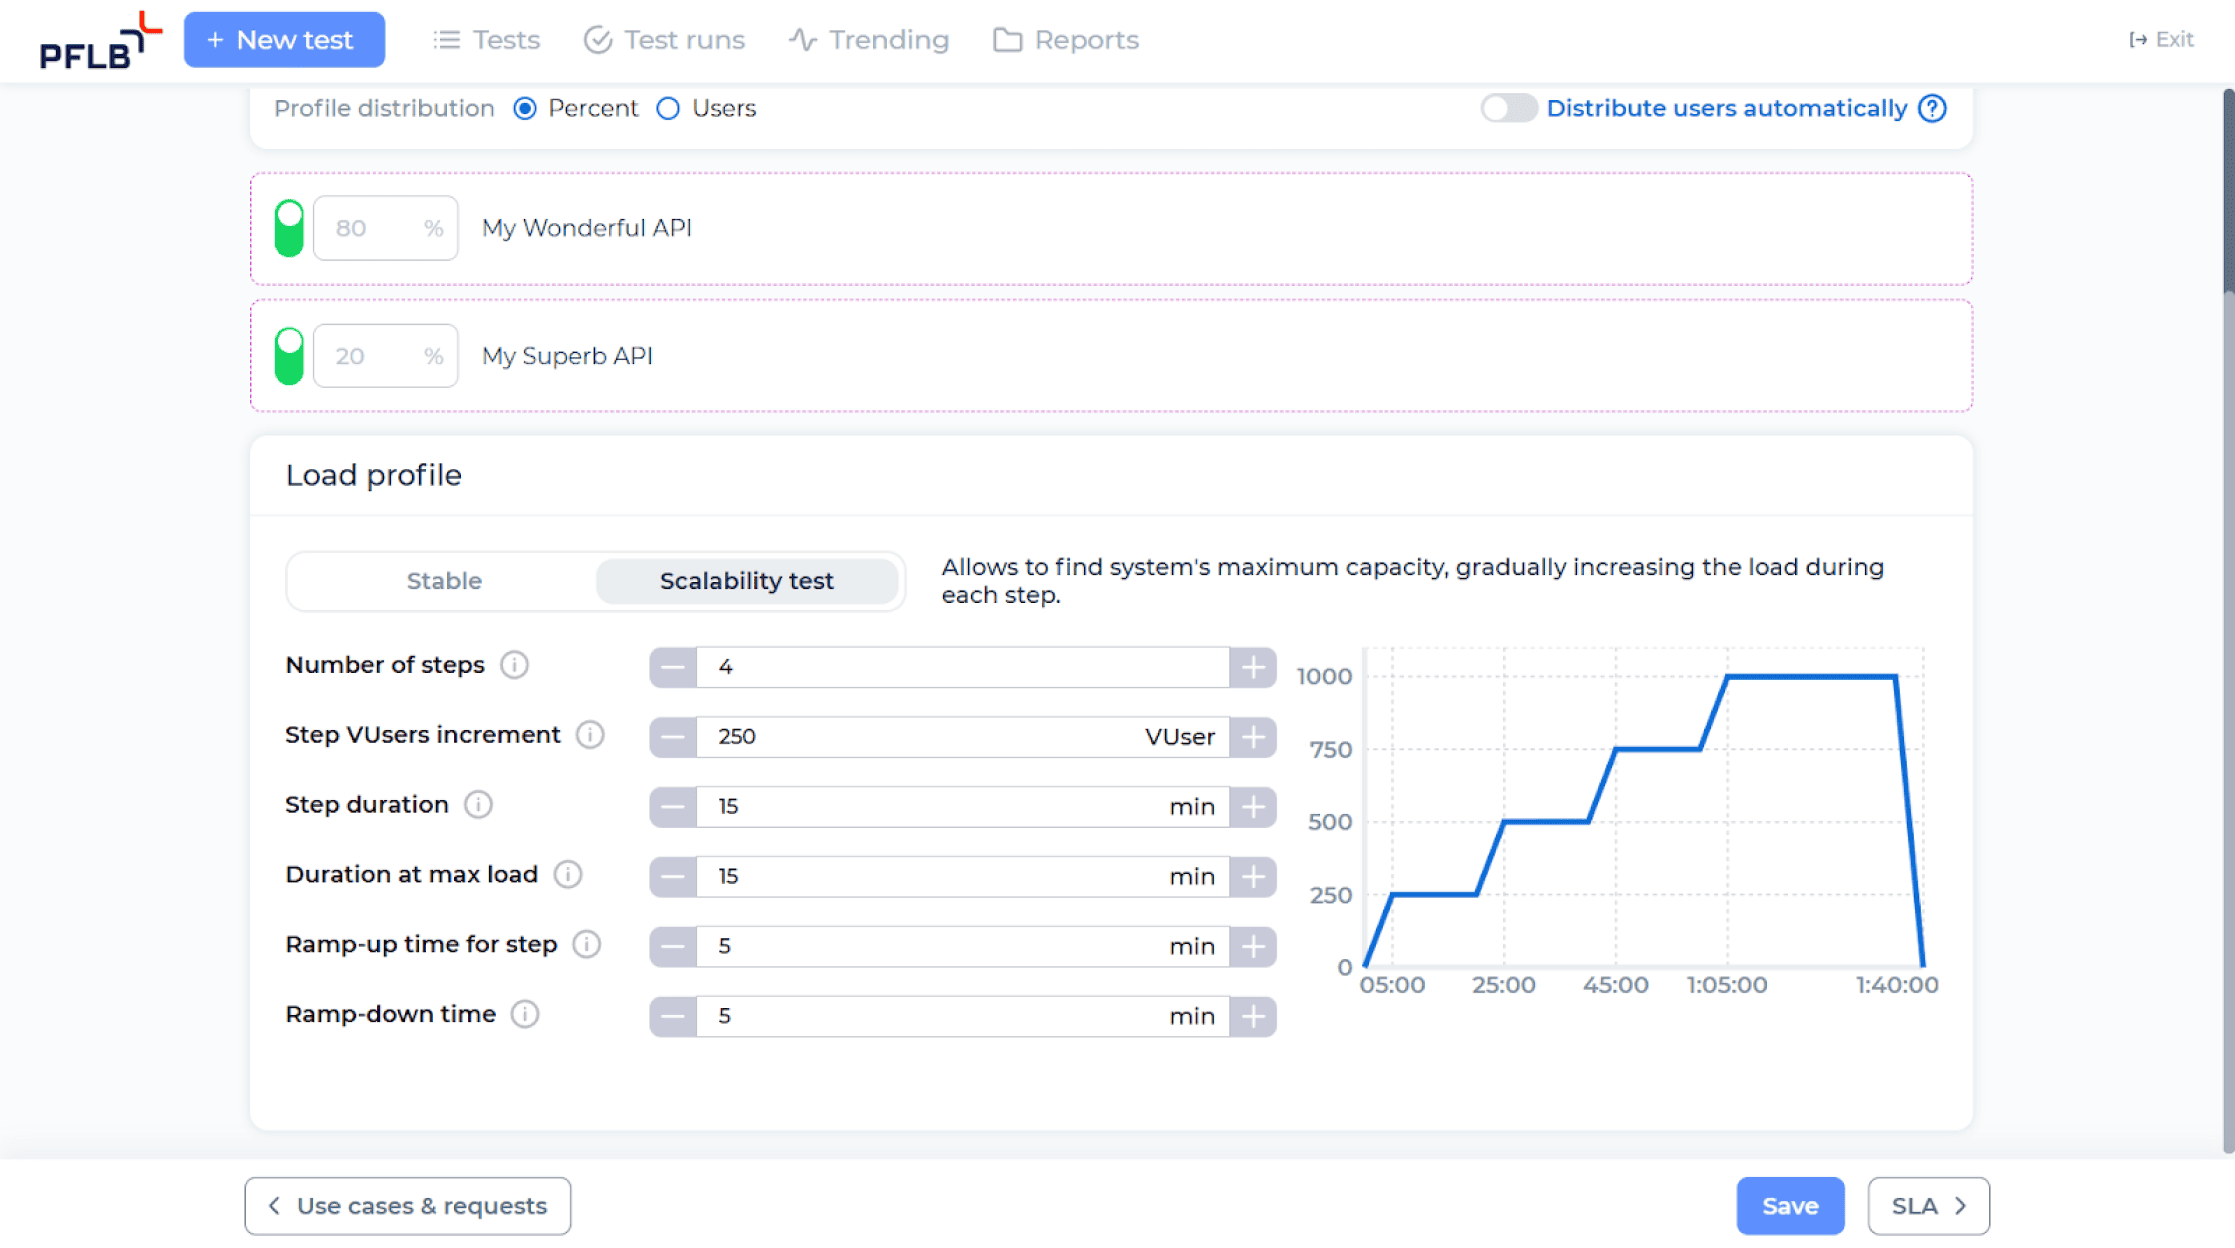
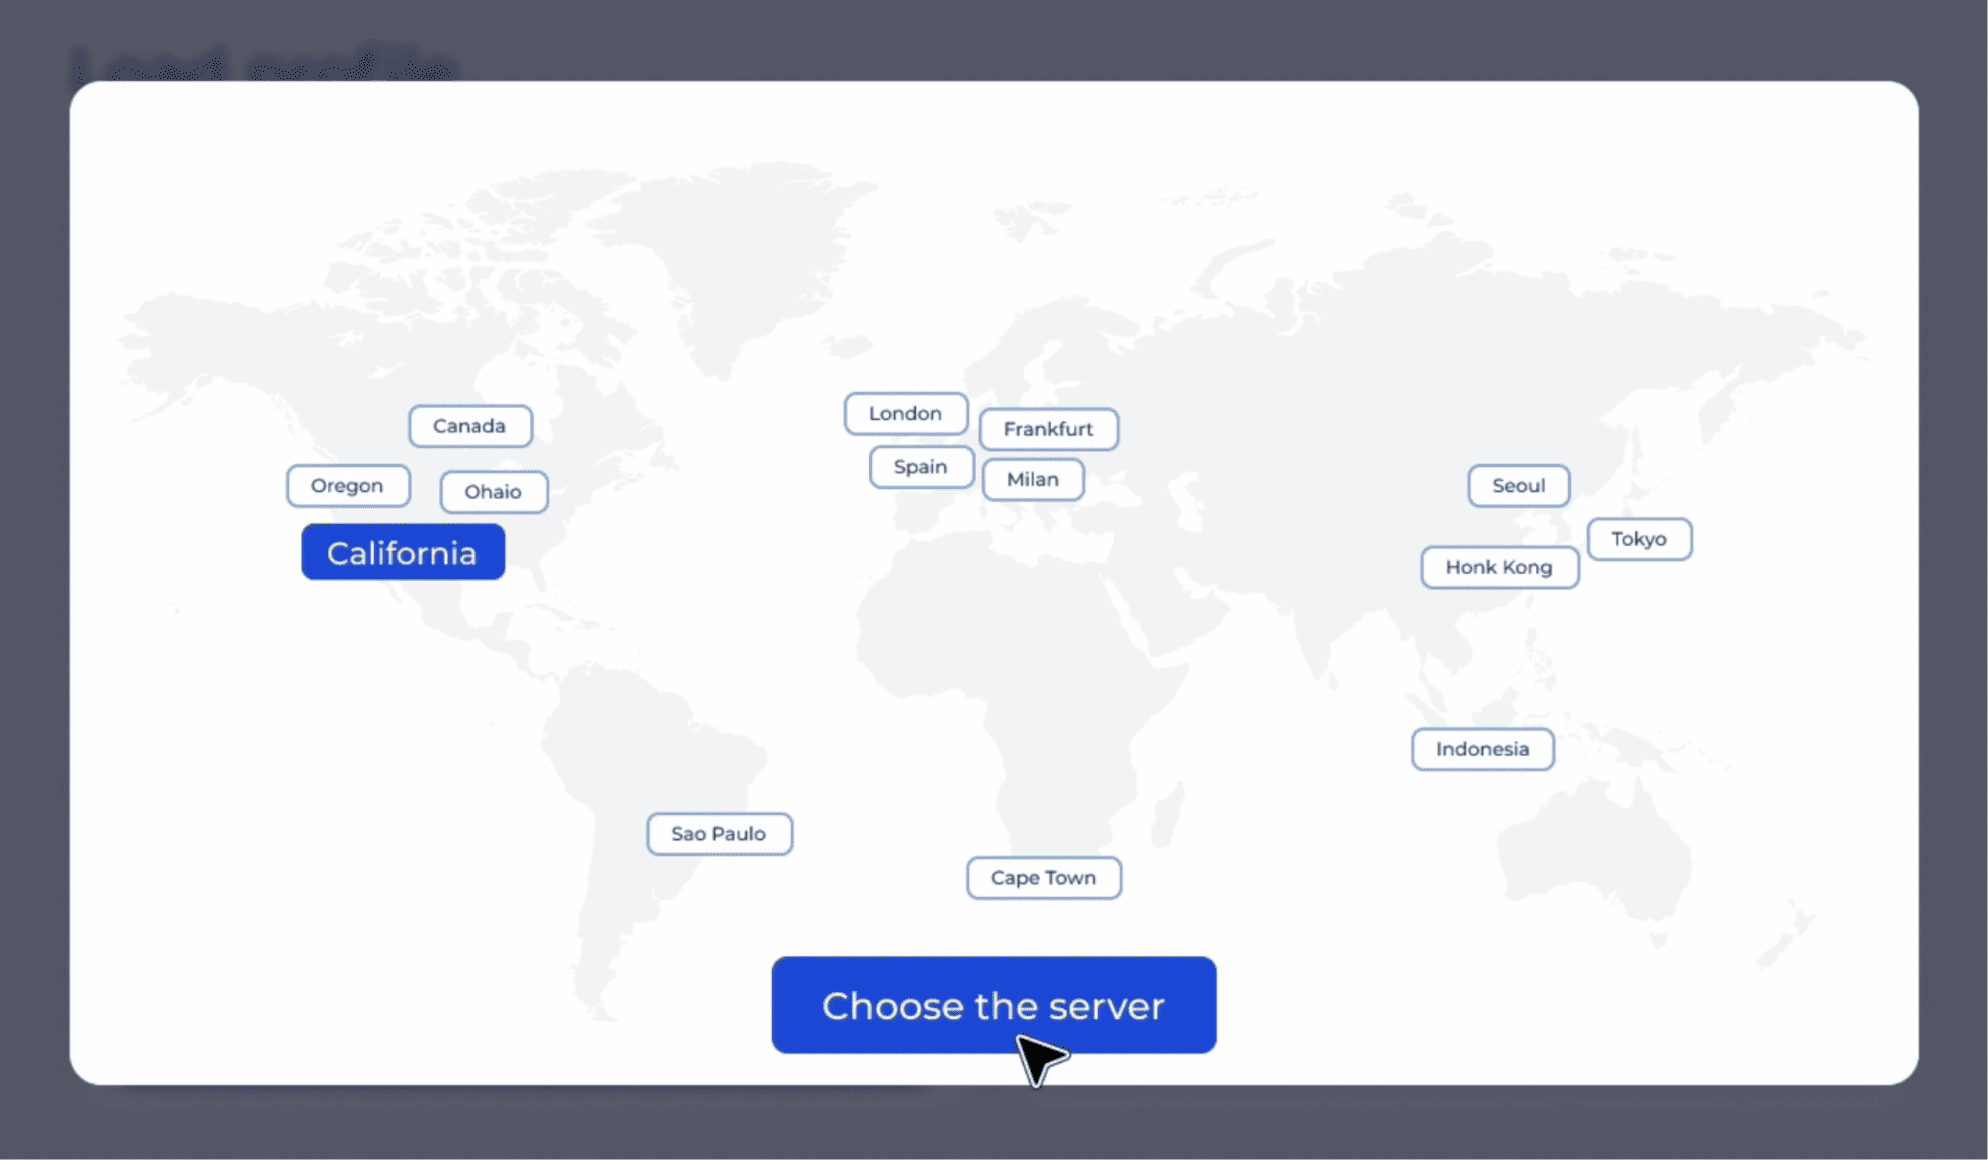
- Select AWS Region: Based on your users’ typical locations, select the location (region) where the load will be generated. This ensures that load testing APIs accurately reflects network latencies and regional server behaviors, providing more realistic results. For example, if your users are primarily in Europe and North America, choose AWS regions in Frankfurt and Virginia, respectively. Proper region selection helps identify performance variations and ensures your API delivers consistent results for its intended audience.
- Configure SLAs (Optional): Service Level Agreements (SLAs) are a crucial feature for SREs to ensure system reliability and performance. Configuring SLAs in load tests helps you align testing parameters with key performance benchmarks like acceptable response times, error rates, and throughput.
For example, if your SLA requires API response times under 200 milliseconds during peak traffic or mandates the ability to handle 10,000 users with less than 1% errors, this metric should guide your test setup. Proper SLA configuration ensures that your tests measure how well the API meets user expectations and business requirements, providing actionable insights to improve system reliability.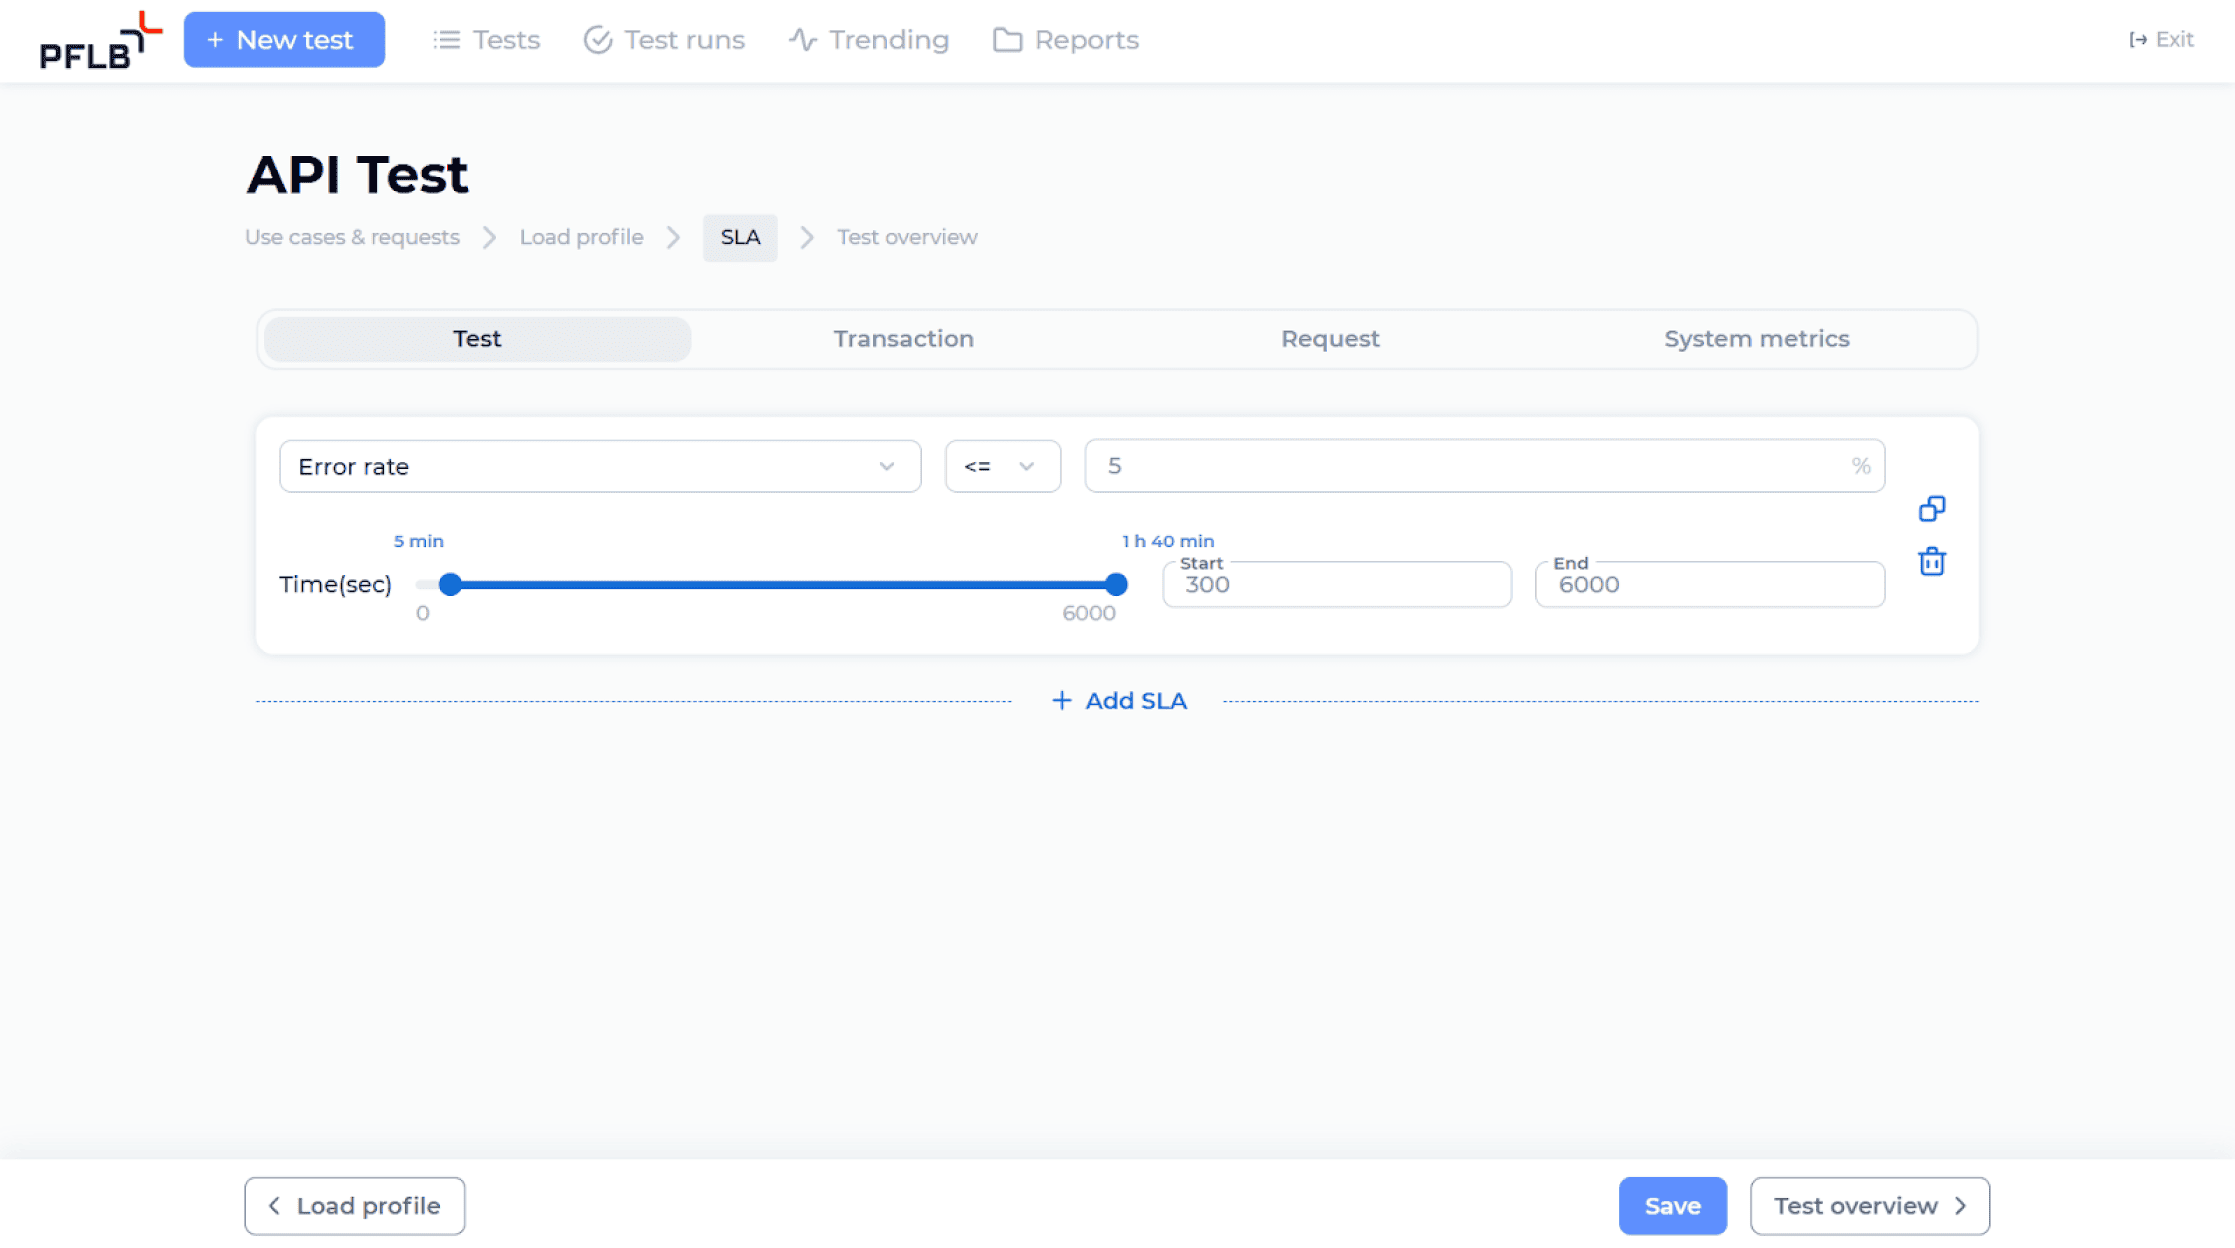
Step 5: Run Your Load Test
Finally, you are ready to start your API load test! Click the “Run the Test” button, and the real-time dashboard will appear. The screenshot below provides guidance.
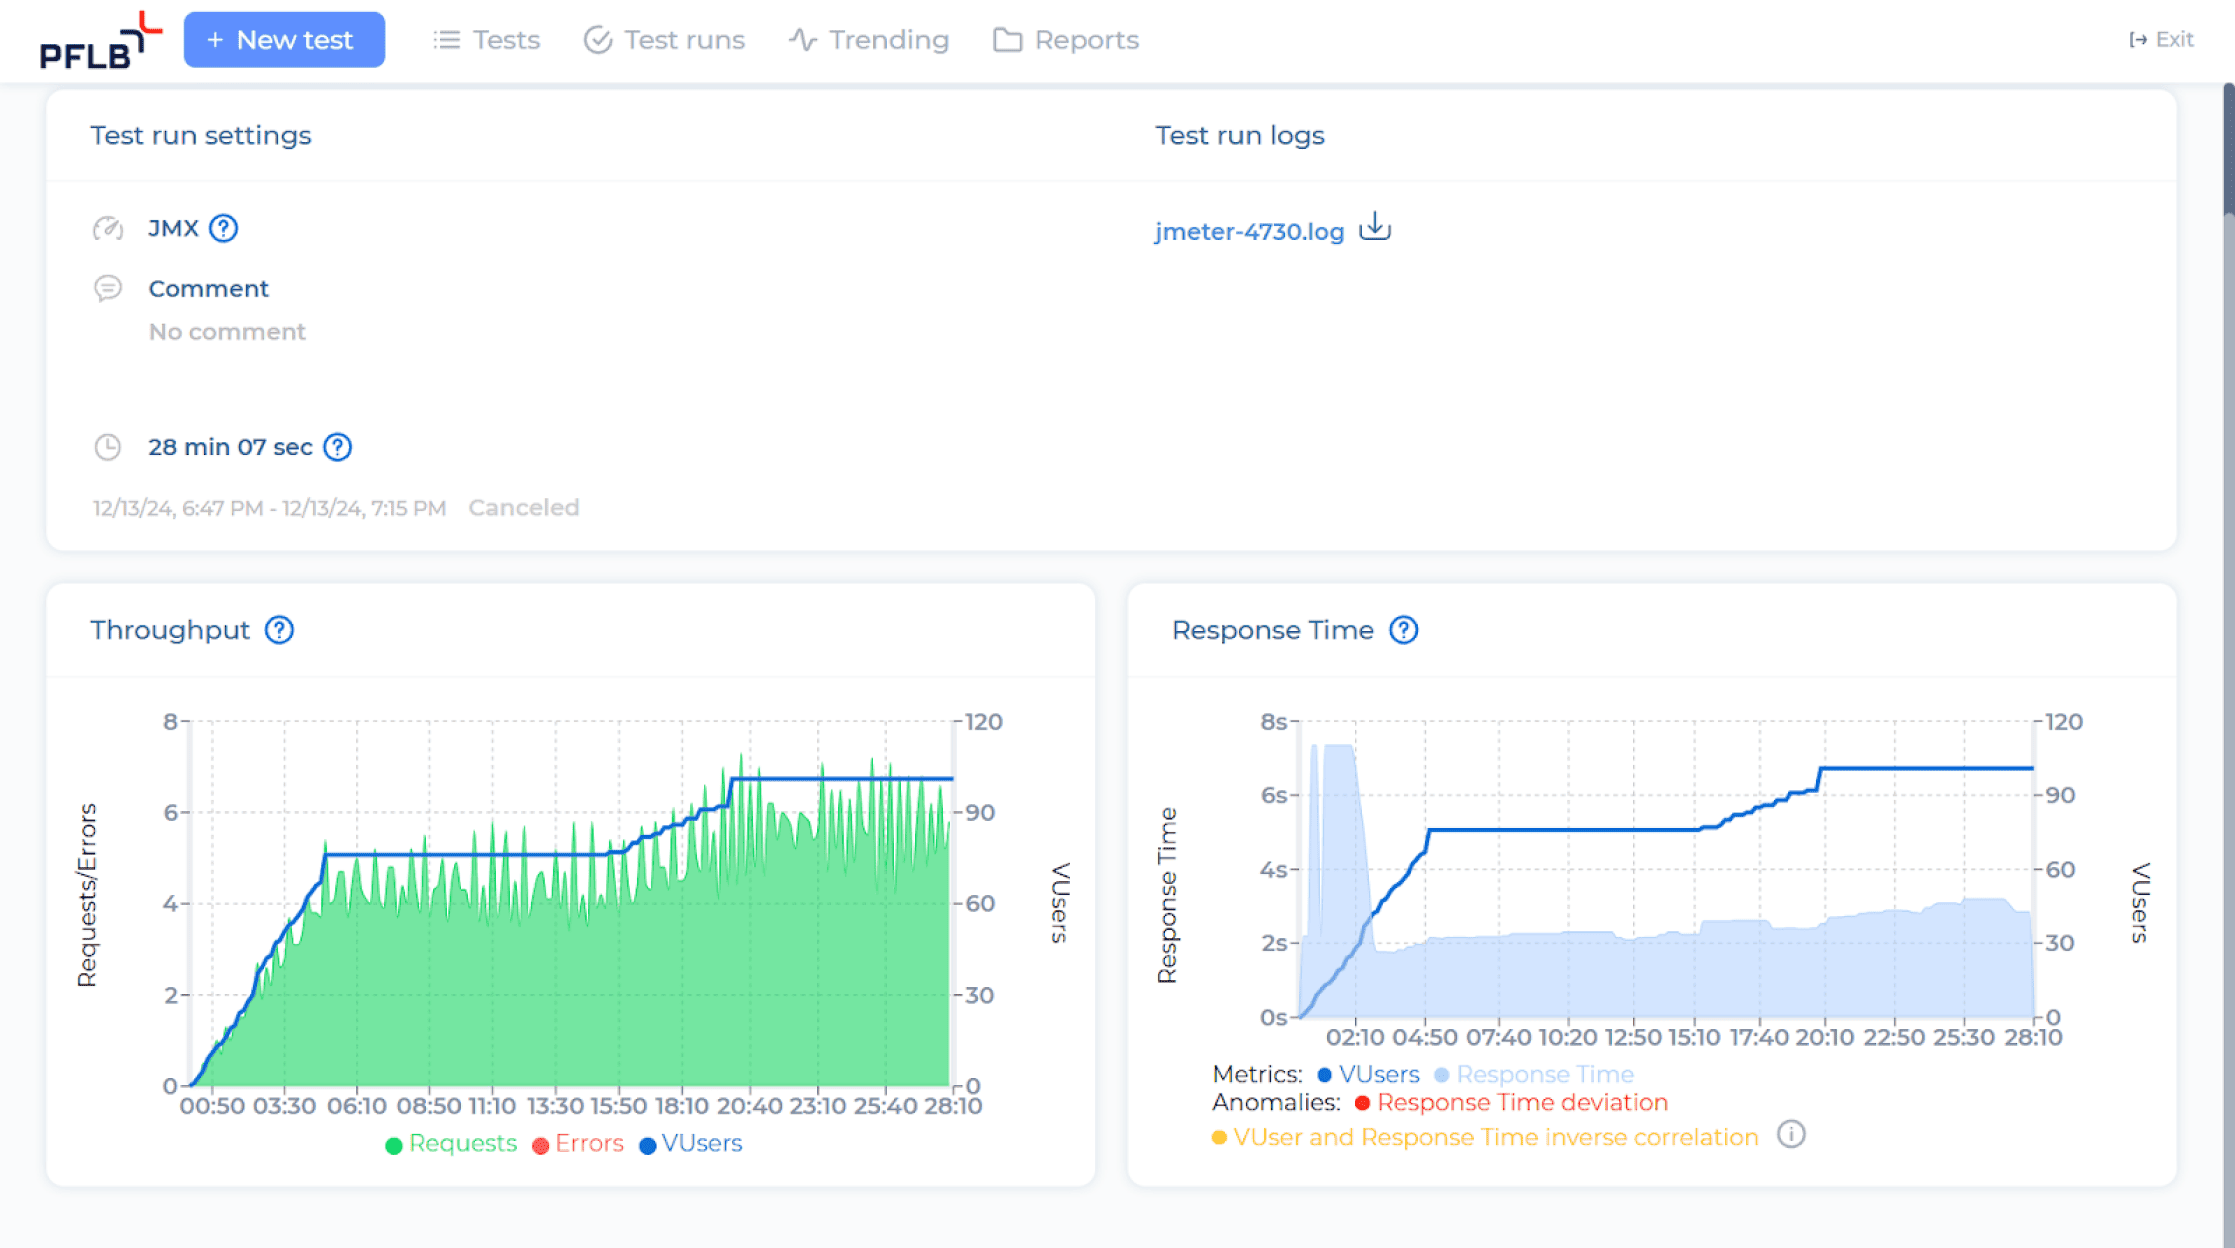
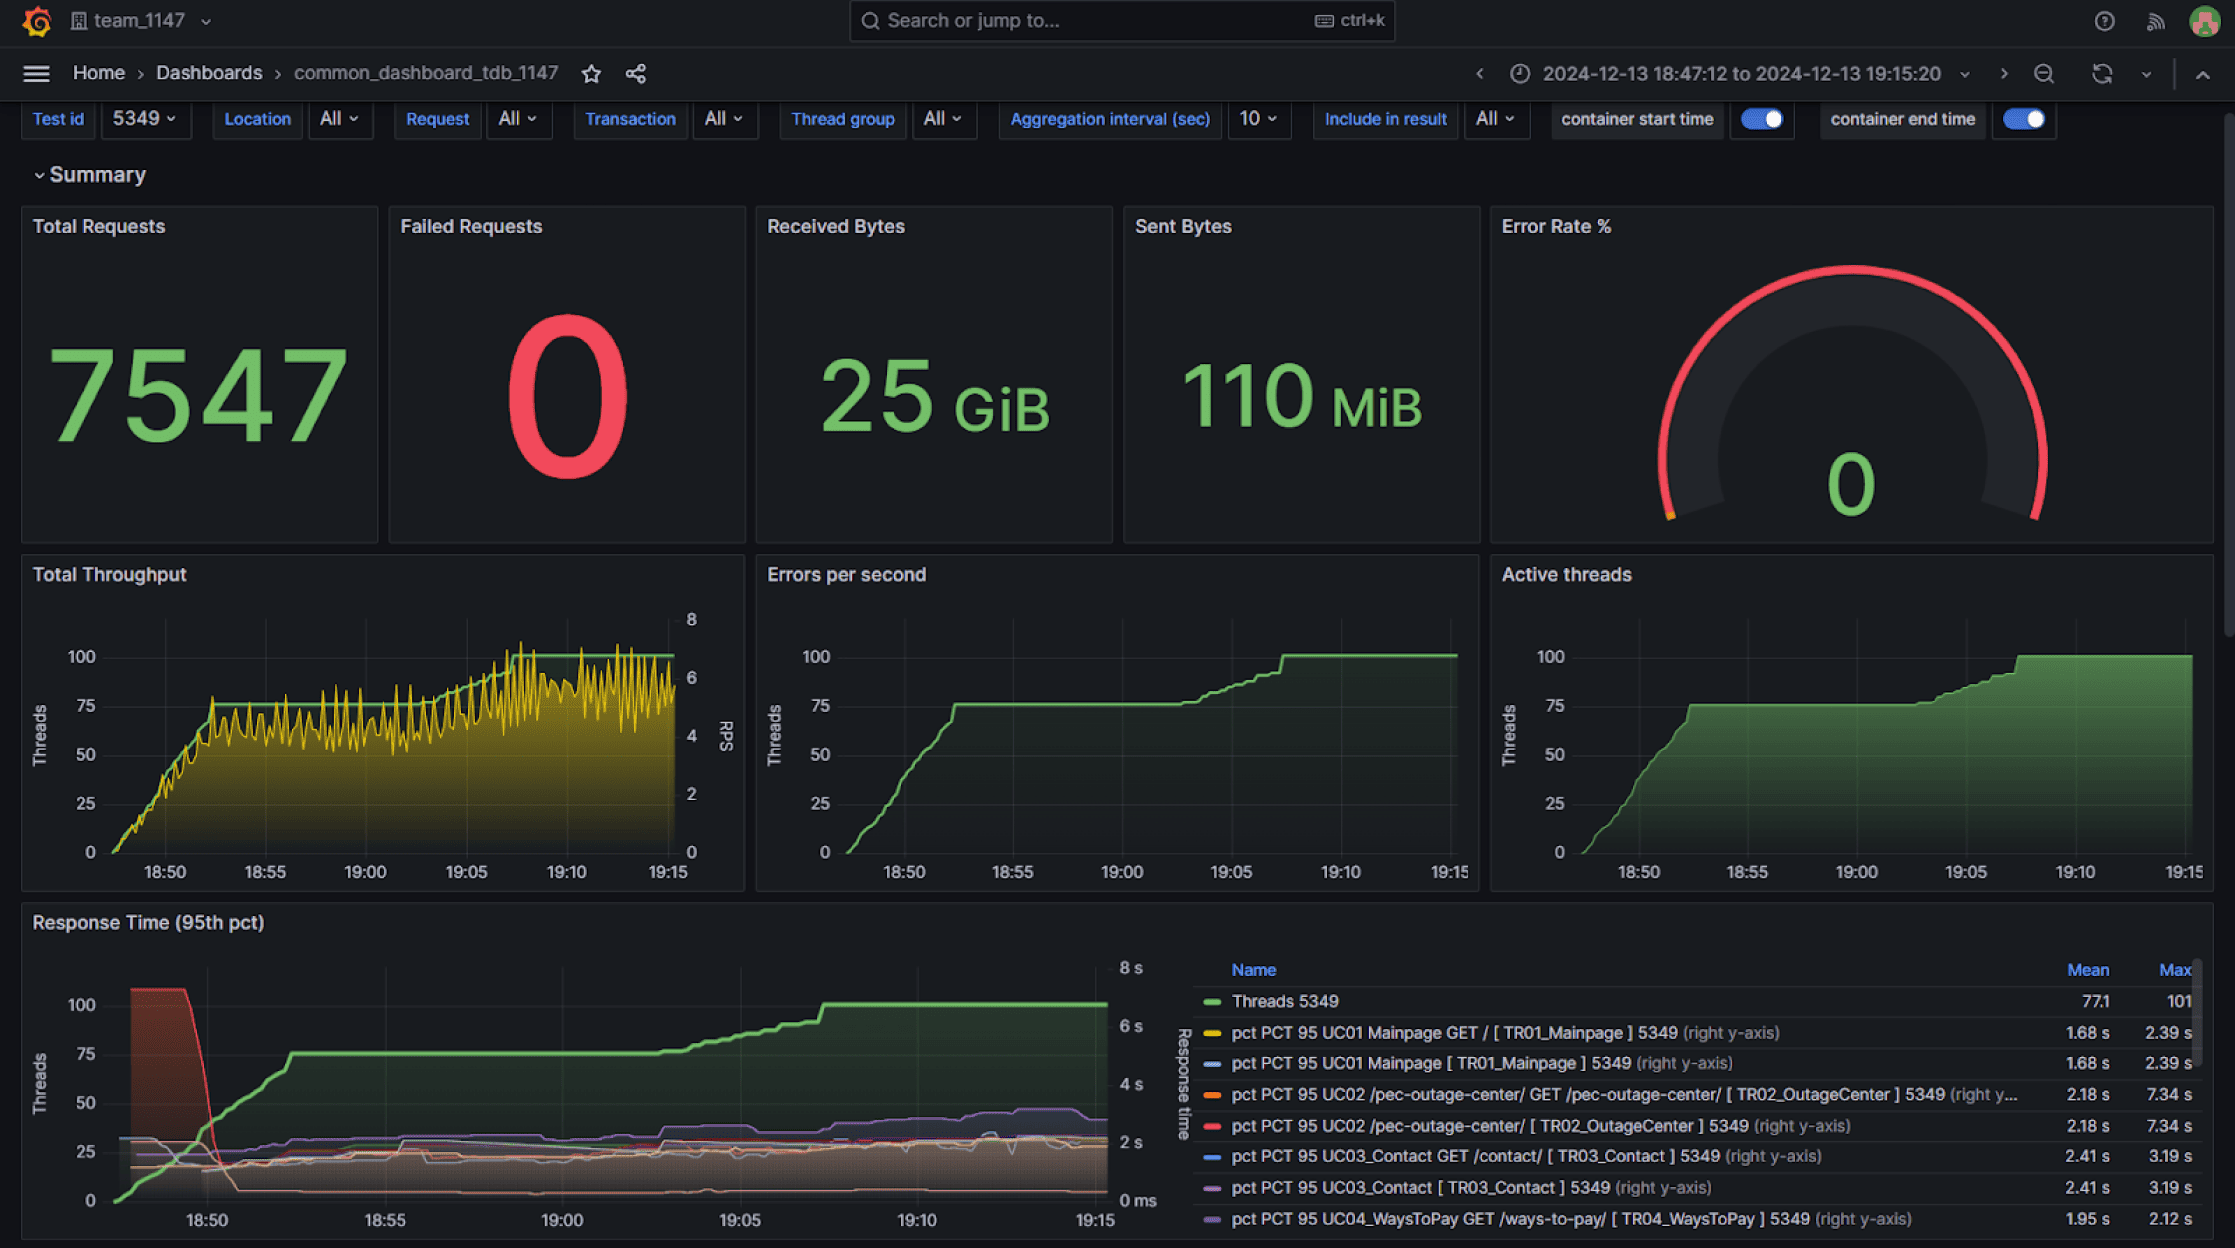
At this dashboard, you can monitor key metrics such as response times, the number of concurrent users or requests per second (RPS), and error rates—the most critical indicators of load testing. If you need more detailed insights, such as API performance testing metrics for individual transactions, simply click the “Detailed Stats” button. This will open the Grafana dashboard, where you can analyze comprehensive test results.
Step 6: Analyze Load Testing Results
There are three ways to analyze load testing results in PFLB:
- Analyze completed test results in Grafana: Begin by examining how response times change relative to the number of concurrent API requests. For instance, did response times increase significantly when the number of requests reached a certain threshold? This analysis helps identify capacity limits and bottlenecks.
- Compare test runs using Grafana’s comparison feature: Use this feature to evaluate improvements or regressions between different test runs. For example, check if API performance improved after code optimizations or infrastructure adjustments.
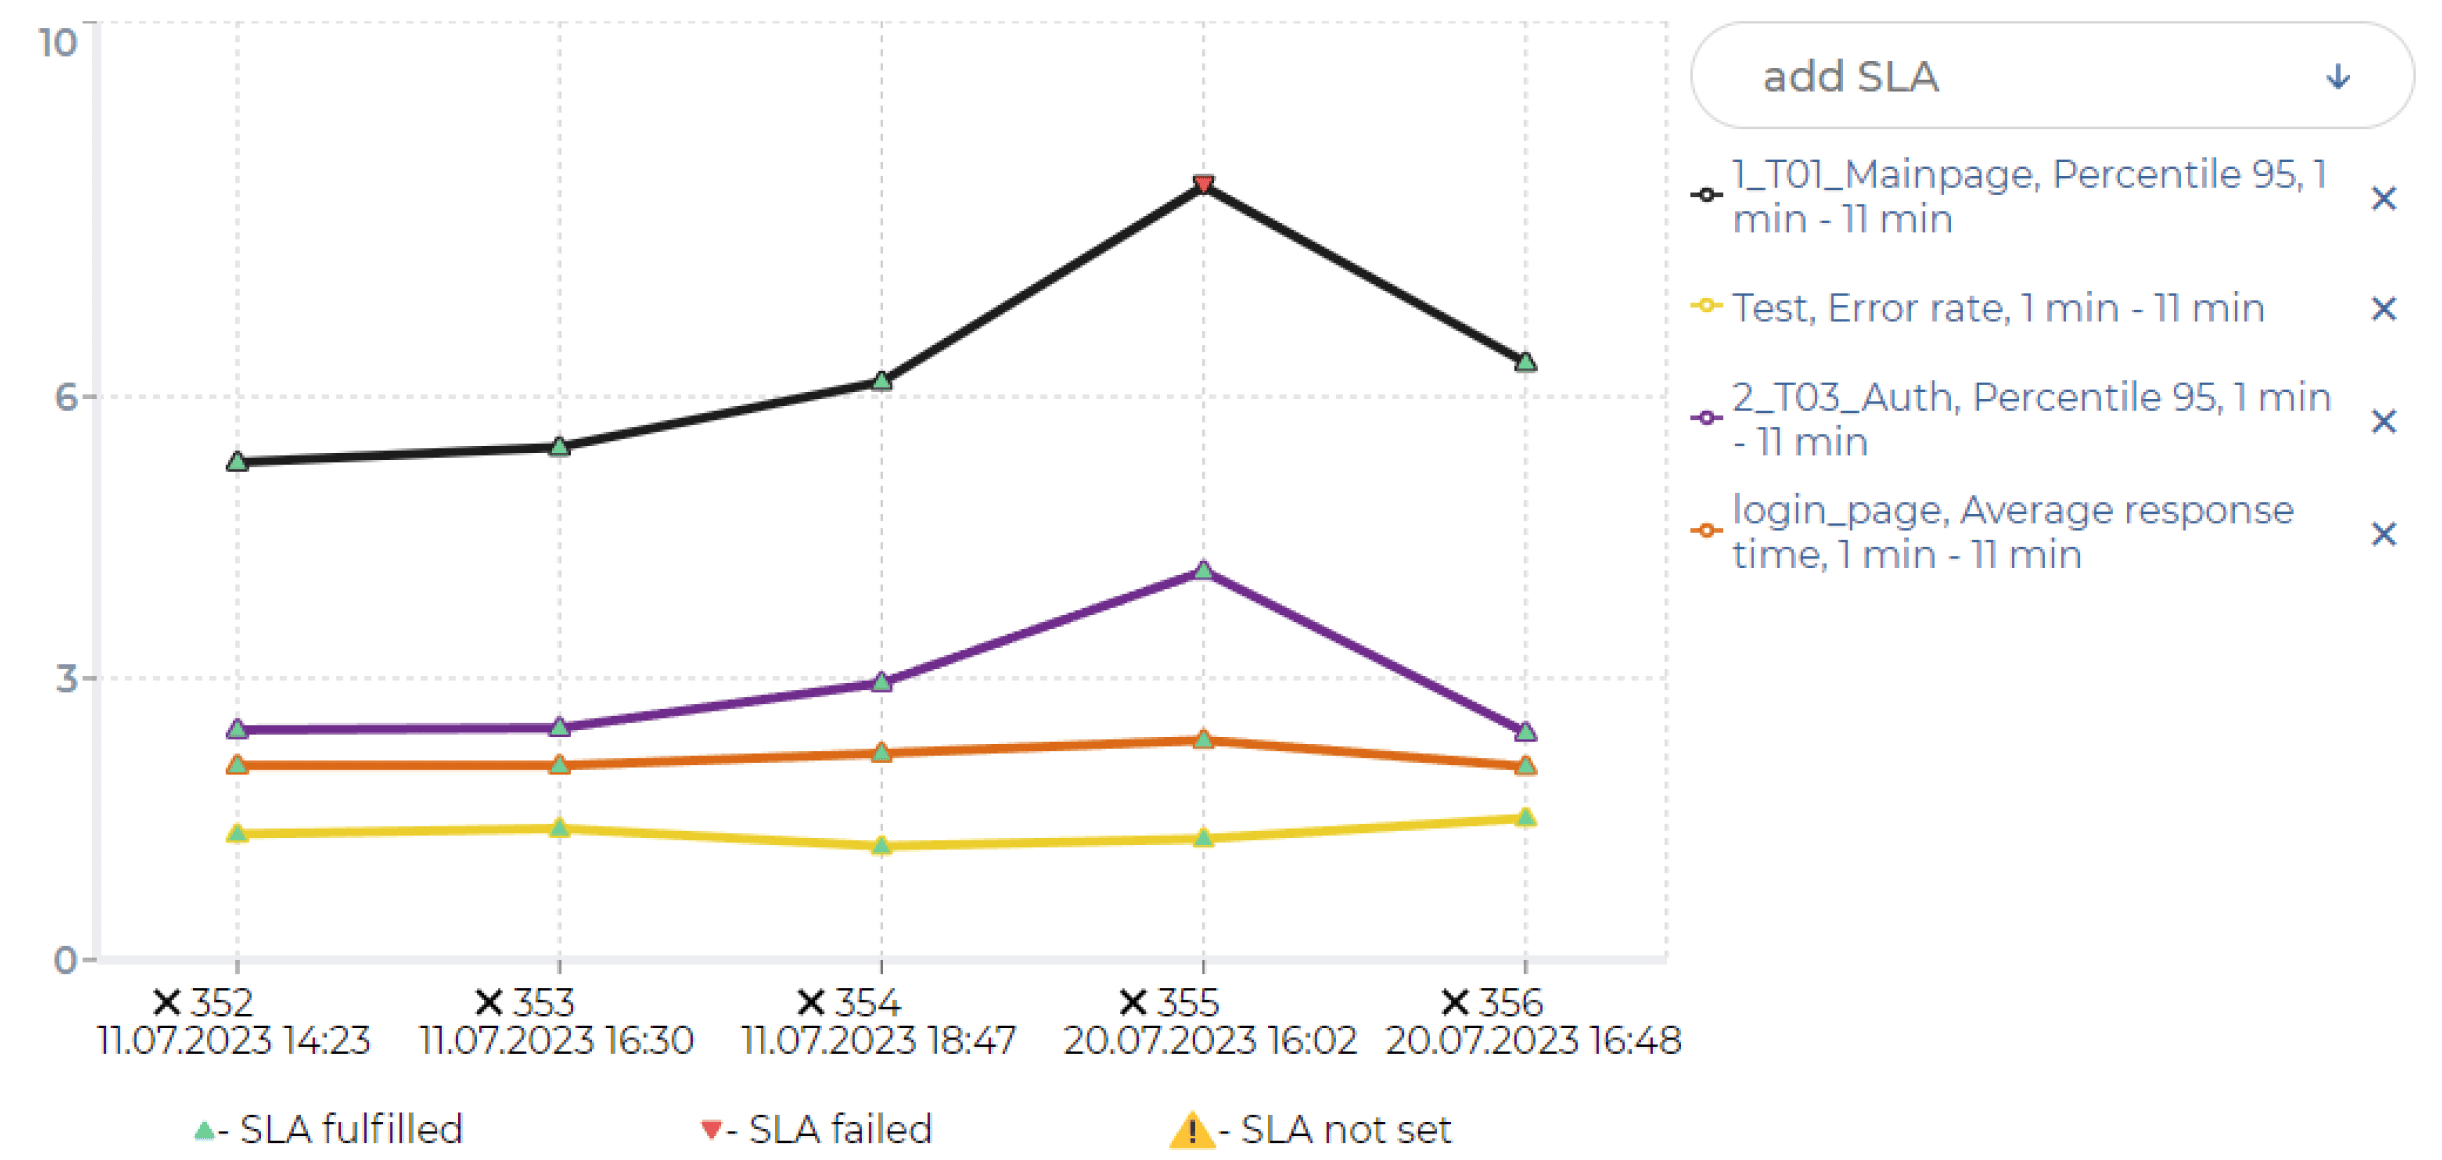
- Track trends with PFLB’s Trend Report: This comprehensive report shows how performance SLAs evolve over multiple test runs. It provides insights into long-term performance trends, enabling teams to address recurring issues. To learn more about the Trend Report, check out the PFLB documentation.
It is common to find areas where performance targets are not met after your first test. Use these insights to address issues and optimize your API. The system you built during this guide can be reused for retesting, allowing for a seamless process of fixing and validating improvements.
For DevOps teams
PFLB’s API offers the added benefit of integrating load testing API into CI/CD pipelines. Automating these tests ensures continuous performance monitoring and quick identification of issues as changes are made. Refer to the screenshot below for guidance.
Best Practices for API Load Testing
To achieve the most accurate and actionable results, follow these best practices for API load testing:
- Test in a Staging Environment with Realistic Data: While it is safer to load test an API in a staging environment, use real production data (appropriately sanitized) to mimic actual usage patterns. This ensures that your test results closely reflect real-world scenarios.
- Define Benchmarks and Performance Criteria: Establish clear benchmarks for response times, throughput, and error rates before testing. These metrics will serve as the criteria for evaluating the success of your API under load.
- Test Early and Test Often: Incorporate load testing into your development lifecycle. Testing APIs early and frequently helps identify performance issues before they escalate, saving time and resources in the long run.
- Simulate Realistic User Behavior: Use parameterized requests, global timers, and the load profile to mimic how users interact with your API in real-world conditions. This adds accuracy to your testing.
- Iterate and Retest After Fixes: It is common to find performance gaps after initial tests. Address these issues and reuse your testing scenarios to validate improvements.
- Automate Load Testing in Your CI/CD Pipeline: Leverage tools like the PFLB API to integrate load testing into your continuous integration/continuous deployment (CI/CD) pipeline. This ensures ongoing performance monitoring with every release.
- Monitor and Analyze Results Thoroughly: Use dashboards and reports to evaluate the API’s performance against defined goals and identify bottlenecks. Regularly compare trends to ensure consistent improvements.
By adhering to these best practices, you can optimize your API’s performance, enhance reliability, and deliver a seamless experience to end users.
Conclusion
Maintaining a high-performance and reliable API is essential in today’s digital landscape. Load testing is crucial to achieving this goal, ensuring your API handles high-traffic scenarios while delivering fast and reliable operation. PFLB’s advanced cloud-based platform enables scalable, powerful tests with minimal effort and cost. Whether you’re a developer or a performance engineer, PFLB offers a comprehensive solution for evaluating your API’s performance under various conditions.
See Also:
- Download the Most Comprehensive Guide to Load Testing
- API Performance Testing with Postman: Is It Worth It?
- Read the comparison JMeter vs LoadRunner vs PFLB
- Discover our gRPC Load Testing tool
- JMeter Cloud Load Testing
- Learn more about our Performance Testing Services